Let us just take a moment to drink in the before of this kitchen as found here and here.
And now… let us talk about half walls.
Do you have a personal feeling on half walls? A life statement? A set of firmly held beliefs?
I do.
I fucking hate them.
Yep… MG just brought out the big guns and dropped the F bomb, because you need to understand how deep this hate runs.

The half wall that started it all….
This is the Rosetta stone of my half wall hatred. What you are looking at is the decorative half wall that divided the formal dining room from the entry way in my first home that I built back in 2011. The front door is to the left and our view is from within the doorway of the study. I didn’t realize at the time, but I would come to develop an intense hatred of half walls that would follow me for the rest of my days because of this very wall.
We all know how big doors are right? How they open in when you are exiting a house? Now do this with three little kids, three back packs, and dogs trying to check out the neighborhood. Do it day in and day out. Hear those backpacks scuff the wall, struggle to get around the dogs when trying to get to the alarm before it goes off, walk around it each time you need to get to your wine rack (Which in those days was ALL THE TIME) and see how much you begin to loathe this damn wall.
Now fast forward to this half wall…

Half Wall of Randomness…
I know it is going to sound incredibly lazy and ridiculous, but do you know what a pain in the ass it is to walk around that damn wall? Need to throw something away? Walk around. Need to get a drink? Walk around. Need to bring in the worlds biggest fridge? Walk around.
What’s worse, is that this wall served absolutely NO FRAKING PURPOSE!!! Why was it even there?! This house is not large, and it is not terribly old. By what logic are we blocking off the footprint of the house and making the kitchen stupid in it’s layout?
TELL ME WHAT LOGIC THIS IS!!
I kept telling Mrs. MG that I wanted to remove the wall. She supported this idea, but did not support living in a construction zone. I attempted to reassure her by telling her it wouldn’t be a big deal… I’d have it down and out quick – no construction zone required… but still she’d look at me that way she does where she frowns in disbelief.
Then the gel staining began, and one day totally randomly she texts me and says, “You can take the wall down if you want.”
Seriously, I nearly crapped my pants. Before she could change her mind I got my hammer and my saw and jumped onto it.
I knew I’d have to reroute electrical so I carefully pulled off chunks of the drywall to expose the electric. Once I knew where it all was I resumed demo. Within hours I had this glorious opening…

Half wall of randomness is gone!
Instantly, the kitchen felt bigger! It felt like it should have always been this way! Light was pouring into the space and I couldn’t understand the transformation before me even though I had just done it! I ripped out the old island thing, removed one line of electric, then relocated the light switch and electrical outlets I wanted to keep to the main wall and dry-walled it up. What I was left with was a huge patch of missing tile and a hole to fill where the wall used to be.
Originally Mrs. MG and I planned to replace the tile. We found a pretty tile that was a rich brown color and it was only $1.45 a piece (roughly 16 sqft due to shape) and it was the shape and size I had envisioned for the space. Quickly, the tile was dismissed as I realized the price was actually over $5 a piece, the tiles would look too large and the pattern would be strange due to the diagonal layout of our hardwoods, and the crazy amount of work that would go into busting up all the old and laying the new.
Have I mentioned that Mrs. MG has a bad back and hips, and that MG has a bad shoulder and terrible knees from her old EMT days?
This is where I circled back to Pinterest again for salvation, and found it.
The answer was painted tile flooring! Eureka! We could reduce waste, reuse what we had, and save a ton of money!!
I took my tile with me to the paint store, grabbed a few paint chips and the Mrs and I began the task of attempting to match paints to the tile. (We used a total of 4 colors, one of which was a last minute decision and is not pictured here.)

Now, before I get any further I want to give full disclosure.
I fucked up.
I spent weeks reading and researching blogs all over the interwebs and at no point did anyone point out that you can not use latex paint on ceramic tile floors. I did EVERYTHING else right, but screwed up and got the wrong kind of paint. I would like to point out that since finishing this project (and yes, there are chips) it was discovered by Mrs. MG that when painting ceramic tile you should use an Alkyd or Oil-Based paint. I purchased floor and patio paints thinking that they would work and that adequate applications of top coat would render it impervious to damage.
I.WAS.WRONG.
Now, back to the paint…
I purchased the small square in Behr’s Premium Low-Luster Enamel Porch & Patio in the color Pyramid.
For primer I selected the Zinsser Bulls Eye 1-2-3 after reading several reviews from people who used it on tile specifically. Let me just say, this stuff is the business! I have used it on my front door, my deck, and the ceramic floors and I have not been disappointed yet. It dries quickly, creates a seal, and acts as an iron solid base. Any scratches I have had in the floor have not gone through the primer and I only used one coat. That’s for real!
Behr didn’t offer a huge selection of colors, there is a little card with roughly 20 choices and Pyramid was the only color I saw in my tile. Additionally, they didn’t sell small cans, only the gallon jugs. Due to this, I decided to check Lowes selection of Valspar products for my other colors. Valspar’s Porch & Patio paint does come in small cans, and can be custom tinted to any Valspar color. While I was frowning deeply at the overwhelmingly large selection of 6 standard colors Valspar offers in this paint, a nice fella at my local Lowes told me that I could do this custom color off the paint chips. I grabbed several, went home and evaluated my tile and came back a few days later with my choices.
Now, this is where you need to trust me and stick to your guns if you choose to buy this paint for a different project. (We just used it on our garage door, front door, and shutters and LOVED it… I just don’t recommend for use on ceramic tile.) When I returned to the same Lowes the nice guy from the day before wasn’t there. There were 3 people in his place who all tried to tell me that he was wrong and it couldn’t be done. I got grumpy and insisted they try anyway. The computer did allow the paint to be tinted and the matches were dead on! Just be sure you get the tintable base. So if they tell you they can’t, do it the MG way… MAKE THEM. :p
First, before I could jump to paint, I had to patch that spot where tile was missing. I grabbed plain white 12 x 12 tiles from Home Depot for around $0.48/each and filled the missing space under the old cabinet, as well as the new space where the wall was removed. (After adding another layer of subfloor on top of the original subfloor to support the new tile.) Then I realized something that would horrify the most detail oriented A type personalities to their very core…
Our builder cut corners but putting the most gigantic grout lines known to man into our floor (our unlevel floor..did I mention the leveling I had to do? No? Oh, must be because I tried to black it out of my mind.) and my new tiles had very thin grout lines. The lines didn’t match! The lines didn’t match!!
What do you do when you are anal and know that the difference in grout lines from the old tile and new tile will haunt you in your dreams? First you try to tell yourself once the tile is painted you won’t notice it. Then you laugh and remind yourself who you are. You tell yourself this isn’t your forever home, in 10 years when you are in ( insert tropical overseas location here ) another country the grout lines won’t matter….. but they will. You’ll be strolling the Spanish ocean front with a glass of wine in your hand crying into the cup because the grout lines are still haunting you.
Hi, I am the Minimal Geek and I’m a big fan of doing things the hard way, I’m also a chronic matcher and perfectionist.

So at 1:30am when you are laying in bed already suffering from grout insomnia you have a striking moment of revelation! Fill in the grout lines all over the floor! This is what you are looking at. What you aren’t seeing are the awkward knee pads I wore over my jammies, you aren’t feeling the 50 degrees below freezing temperatures because this shit stinks to hell and all the windows are open during Washingtons second winter, and you definitely not shaking your head thinking “Why doesn’t this crazy bitch just rip it all out and start new?”
Then, the sanding began… after scuffing up the surface of the tile, I cleaned, laid the primer, and then began the painting. I used foam rollers to apply the paint, but since I wanted irregular coloring I cut random chunks out of the foam. Each layer was rolled on at random and ultimately created this:

Nailed it!
After the paint was dry I applied 3 coats of Varathane Polyurethane in clear satin. Remember what I said about Poly in my cabinet post?
“Most Polyurethane’s are meant for wood floors and wood products and will leave an amber hue to anything you apply it to.”
This product does not, it does dry crystal clear and the finish is luxuriously soft under foot. Now, I’m sure that this is protecting my floor decently. My 100+ lb dogs are not tearing it up with their nails, and it seems to be holding up fine to normal traffic. It does not protect the paint under it from anything that drops onto the floors. I have a few chips in the paint which happened within hours of the last layer of top coat being fully dry. I raved, cried, yelled, cursed, and despaired at my precious floors being ruined. This isn’t so much due to the top coat as it is due to the softness of the latex paint underneath. Again, DO NOT USE LATEX PAINT! Don’t be like MG. Don’t find yourself on a Saturday night crawling around on the floor screaming at every chip you see.

My million dollar floor reveal!
This was my floor when it was all said and done, and I am damn happy with it and proud of the work that went into it. I plan to just touch up the chips and live with it for a while, at which point I will sand it all off and start over with the right paint. With a pattern like this, you really can’t mess it up. The longest process is waiting for the drying time in between.
Now that I was done with all the major stuff, it was time to move onto my island I had always dreamed of. I wanted something that looked like a massive antique piece of furniture, with a rustic butcher block top. We define the look in our home as Parisian Chic; this is basically an eclectic mix of old, new, pops of bold color, and lots of art. I have trademarked this term as I invented it with the genius of my own brain… no stealing.
This is what I ended up with….. *dramatic reveal music*

Faux butcher block from pine panels!

Converted table to custom island!
I got my idea for this island from my kitchen table. We bought it at Habitat for Humanity Restore in Olympia after we first bought our home. It was big, solid, and old, so we loved it. My in-laws are bringing out Mrs. MG’s heirloom furniture this summer so the table was going to be replaced, but I didn’t want it’s beauty to be lost forever. With blood, sweat, and tears, I converted it into a massive custom island, complete with caster wheels, trash/recycling storage, and appliance storage. I also built an entire shelf for our dogs food and medications. Real butcher block was out of our budget, and I wasn’t too keen on making it from scratch so I went back to roaming the isles of Lowes for new ideas. This is where I stumbled across pine project boards for building little cabinets and tables. It has the look of butcher block but is lighter and cheaper! I grabbed 3 pieces and attached them to the top of my island, then puttied in the gaps and put on a food grade butcher block sealant. From there, and after lots of sanding, she was oiled and ready to go!

Open shelving above the fridge regains precious storage space that is actually usable.
Last but not least, I added some simple open shelving to the space above the fridge. We previously had one of those pointless tiny cabinets with doors that couldn’t really be opened due to the high profile of the top of the fridge. I got rid of those and built a shelf out of more scrap wood I had from an old antique table I had salvaged the top off of. I cut it down and mounted it above the fridge to the wall and cabinet with brackets. It is now the perfect place for the bulky knife block that holds our rarely used steak knives, a wine rack, and my antique wine box that holds all my random scented wax melt products.
Now it is time for the moment you’ve all been waiting for…. the big kitchen reveal…
Ta Da!
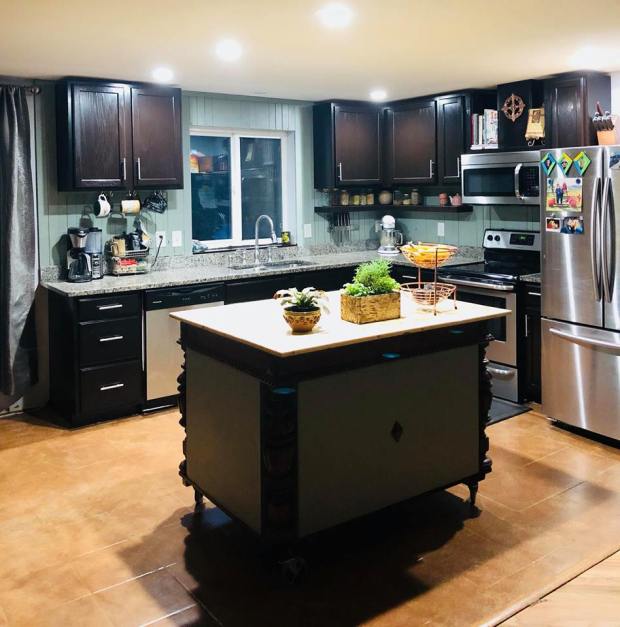
After! My complete kitchen renovation!
We have been cooking up a storm in our new kitchen, and the new footprint is so much better than the original! We absolutely love it and can’t believe the difference. It took several weeks and a lot of hard work, but for a few hundred bucks we got a major transformation! Our blah kitchen is finally a show stopper.

One comment