Author: theminimalgeek

Ways to replace Milk, Meat, and Eggs during Quarantine.

This is 2020, huh? We all left 2019 behind feeling cautiously optimistic that after a few years of hell, THIS was finally going to be our year. Then COVID-19 aka Corona Virus happened and the universe did a collective face palm.

So now you are doing the following: “sheltering in place,” “self-quarantine,” “social distancing,” or straight up under “quarantine” and you see that you don’t have enough milk, protein, or eggs to get you through this. You can’t go to the store, or your store is sold out. Maybe you were in between shopping trips or pay days when this happened, or maybe your whole neighborhood lost their fucking minds and bought everything and left the rest of you high and dry.

I am hoping that you’ve got some oatmeal in the back of your cupboard that has been there for who knows how long, or you are able to make a few purchases from Amazon–because if you are then I have a few ideas to help you get through. Sorry guys, there will be no help here for toilet paper but I have read that crumbled up newspaper will get the job done. Time to raid your recycling bins…

Have you run out of milk or avoiding the store all together? Have rolled oats buried somewhere in your cupboard or pantry like most people? Well that oatmeal you swore you’d eat but never did is now going to become milk! How to make oatmilk. All you need is rolled oats, water, and a blender. We’ve made oat milk a few times and it is probably the best non-dairy milk option for non-plant based people in terms of flavor. Oat milk is outrageously creamy and lacks the affected flavor that soy milk has. This is my plan for when the kids cow milk and my soy milk runs out.

Were you unable to get your hands on beans or much by way of protein sources before the stores ran out? There is nothing like an emergency for the entire world to suddenly decide that beans are good enough for them to eat. Now is your time to enter the world of delicious and nutritious WHEAT MEAT. Wheat meat is one of my favorite treats and every few months I’ll make a big batch and freeze it by the pound. I’ll pull it out when I’m getting tired of beans and tofu or if we want some meaty finger food for a cheese board during game night.

One serving of seitan (aka wheat meat) contains the following:

  • Calories: 104
  • Protein: 21 grams
  • Selenium: 16% of the RDI
  • Iron: 8% of the RDI
  • Phosphorus: 7% of the RDI
  • Calcium: 4% of the RDI
  • Copper: 3% of the RDI
Boiling method for seitan aka wheat meat. You can make several pounds at once and store in your freezer.

Fortunately the core ingredients that most non-plant based people don’t typically have in their pantry are still relatively affordable and available in short time on Amazon.

You’ll need Vital Wheat Gluten and Nutritional Yeast Flakes, anything else by way of flavor is just extra. You can season wheat meat any way you’d like. The most common recipies use a soy sauce based simmer broth (time to pull out that drawer of soy sauce take out packets you always thought you’d use!) and some of the more upgraded recipies use broth as the core flavoring; this can be chicken or beef flavor.

Get Vital Wheat Gluten from this seller on amazon by the end of the week, 4 lbs for $15 will get you a decent amount! When wheat meat cooks, it doubles up in size and the high protein count means a little goes a long way.

Nutritional yeast is a great seasoning and used in many plant based recipes and it is essential, in my opinion, for perfect Seitan. Same seller and fulfilled by Amazon. 1 lb for $13 and it will last you forever, more or less, you can even use it with some steamed potatoes and carrots to make the most delicious nacho cheese ever… I would literally eat that cheese with a spoon.

Keep in mind that the sky is the limit in terms of adding flavor to seitan. Instead of boiling in broth, you can also wrap in foil and air fry, steam, or bake. All methods provide slightly different textures. Boiled seitan will be chewy, while air fried, steamed and baked will be more firm.

Here is a very simple, beginners seitan recipe.

Ingredients

  • Dough:
  • 1 cup vital wheat gluten
  • 3 tablespoons nutritional yeast
  • 1/2 cup vegetable broth
  • 1/4 cup liquid amino acid (such as Bragg(R))
  • 1 tablespoon olive oil
  • 1 1/2 teaspoons minced garlic
  • Cooking Broth:
  • 4 cups vegetable broth
  • 4 cups water
  • 1/4 cup tamari

Directions

  1. Stir vital wheat gluten, nutritional yeast, 1/2 cup vegetable broth, liquid amino acid, olive oil, and garlic in a bowl until ingredients come together into a ball. Knead ball until dough has a rubbery texture. Divide dough into 3 equal pieces and shape into 1/2-inch thick patties.
  2. Bring 4 cups vegetable broth, water, and tamari to a boil in a large pot. Carefully place patties into boiling broth; cover pot and return to a boil. Set lid slightly askew to vent steam and reduce heat to low. Continue simmering patties until firm, turning patties occasionally, about 1 hour. Remove pot from heat and set lid aside. Allow patties to cool in broth for 15 minutes before serving.

If you are overwhelmed by diving in with Seitan, you can always fall back on TVP (Textured Vegetable Protein) and it is also still available with quick shipping on Amazon at a reasonable price. According to my area, it would be here within Amazon Prime’s 2 day shipping window.

Here is a step by step guide on how to use and cook TVP, because why re-invent the wheel when someone has already perfected it?

Now lets talk about the fact that you eat eggs every day and you are now out. Your world is crumbling around you as you realize that you need eggs to bake that box of cake mix in the cupboard, or to make french toast, or to batter the meat you are about to fry up. Surprise, you don’t need eggs to do a lot of these things! In our house, when baking we swap eggs for applesauce. When battering we use flax seed powder (it keeps in a jar in the fridge or freezer for forever) also available on amazon as the vital wheat gluten and nutritional yeast through the same seller, Anthony’s Goods.

Also, can we just all say THANK YOU to Anthony’s Goods for not jacking up the prices during these times like all the other assholes on Amazon? THANK YOU!

Now you have a plan during these semi-quarantine times to replace the milk, protein, and eggs you weren’t able to get or buy enough of before all hell broke out. And who knows…maybe you’ll keep these meatless options in your life after this all passes?

Dollar Store Zero Waste

Cheap zero waste items you can’t live without.

If you remember, a while back I searched the very same treasure filled shelves for great vegan finds at the dollar store. I did this to try to eliminate the misconception that eating vegan (or even vegetarian) is expensive.

I’m finding that same misconception coming up again as I research the zero waste lifestyle and how to help my family transition to it, but never fear–MG’s favorite shop is here! Keeping in mind that some items may be regional and are subject to stock, I kept with the items that would be commonly found in any store. Zero Waste purists may attack me on some of these suggestions based on the material choice, but at the end of the day the ability to be able to afford to pick different materials is a privilege that we may not all share. The goal of going Zero Waste is to reduce your carbon footprint, and if we are all taking these small steps together to make these changes, does it honestly fucking matter if Karen uses a reusable BPA free plastic water bottle instead of a metal one? If you’ve come here with judgment in your hearts and feeling that the small efforts of others is simply not enough, please find your way to a professional who can help you work through your entitlement. If you are here curious about some items that you can pick up for cheap to help you reduce your waste, then keep on reading my friend.

Generally, if I need something for my household needs but don’t want to pay Walmart prices, I stop into the Dollar Tree first. They’ve got all sorts of goodies and I usually find what I want. Like that time I needed big bowls, so I bought these plastic flower shaped ones that are slightly too big but at that point I had only paid $4 for four of them instead of $5 for one somewhere else. Or the time I wanted a pretty glass bottle for my dish soap and my mind palace reminded me I had seen glass vinegar bottles at the Dollar Tree recently. I’m not saying this is Crate and Barrel level shit, but if you are newly married and can’t splurge on the $50 box set of dishes, you should know you can buy plates, cups, and bowls at the Dollar Tree for the low price of… you guessed it, $1 each.

I went into the Dollar Tree with a goal so I’ll focus on that first. I wanted to recreate the ever popular Zero Waste Travel Bag that so many people start out with. What is this bag? It is generally a reusable bag that contains a water bottle, cutlery, a napkin, and a reusable straw and/or coffee cup. I made one with the basics that I like to call the, “Zero Waste Starter Pack.”

A starter size Zero Waste Travel Bag

Here is what I’ve included in the picture:

  • Reusable bag
  • 100% Cotton Washcloths to use as napkins
  • Cutlery: Fork, Knife, Spoon
  • Wet pouch for dirty napkin and/or cutlery
  • Glass Waterbottle

This zero waste travel bag will set you back $5. Assuming you didn’t want to bring your nice cutlery from home, you need a water bottle, and you don’t have a spare rag/washcloth for a napkin. I think this bottle is meant to be decorative, but I saw no reason it couldn’t be used daily for water.

After I completed my mission that proved you don’t need to buy an expensive name brand water bottle, a fancy organic muslin cloth, or any other ridiculousness that affiliate link laden bloggers will tell you that you MUST HAVE to start your Zero Waste life, I got curious on what other treasures I could find. I did try to stay away from plastic because many people worry over the plastic code on the item.

Translate your plastics codes

I’m not going to lie, this list sent me into a fucking tail spin of fear and paranoia. I’ve always been that mom who was obsessed with everything that went into her little babies bodies. I cloth diapered, I made my own organic baby food, I purchased organic meat, I used safe sunscreen….This list made me suddenly afraid of every scrap of plastic in my kitchen. I had a freak out, which my emotional support Hufflepuff had to bring me out of. We decided together we’d gradually phase plastic out of the kitchen and we immediately tossed anything on the dangerous list. Crisis averted, I was able to get back to work. Now you understand why I avoided plastic items… and we may now resume your regularly scheduled blog reading.

LED lighting is a MUST for any zero waste home.

Let’s start with something that is a little less obvious. Your lighting. Are you still on those old ass CFL bulbs? If you are, you need to upgrade to LED. LED bulbs last fucking forever…almost, and they use less energy. Many power companies will even give them to you for FREE. Some companies will schedule home power audits where they come out and swap all your old shit for LED. Sometimes they try to hand them out in stores, or have rebates you can take advantage of online. Otherwise, they’re pretty cheap and the Dollar Tree has TONS of them! $1 for a bulb that will last up to 14 years? That is just craziness! We switched our bulbs to LED 4 years ago when we bought our house, and I prefer the Daytime light. (because I live in the land of the perpetually dark where we only get sun 2-3 months out of the year so I’ve got to artificially recreate it in my home) We’ve got them in every shape, size and wattage so there is no excuse that you can’t find it for your chandelier.

It’s a reusable note pad, son!

I wanted to stop using so much paper at work when I kept random notes, so I grabbed a small dry erase marker. I write my notes on it and erase them as I mark tasks off my list. I converted our family calendar to dry erase, and my shopping list on the fridge is also a dry erase board. Yes all that paper can be recycled, and composted, but why keep buying paper? Obviously you’ll still need paper for things you need to keep, but for random shit like remembering the name of the person you are talking to on the phone, or needing to remember to pick up OJ at the store, this works like a charm!

Reusable shopping bags in all shapes, sizes, and prints

For those of you that still live in areas where they have plastic bags in the stores and you still haven’t purchased reusable bags for I don’t know why you haven’t reason…they’ve got them at the Dollar Tree. There was literally a sea of them tossed on a bottom shelf, some were princesses, some were floral, some were animal print, some were plain. I’ve decided I’m going to start gifting in reusable bags and kitchen towels from now on. The Dollar Tree is where I’m going to get all that stuff.

So.Many.Options.To.Drink.From.

There are several reusable options, but I was looking for glass and I happened to find it over by the home decor section rather than the dishes. The jars with the corks nearly became my dish soap container, until I realized the openings were too big for a wine spout. The real star of the show here are the reusable glass jars with straws on the top shelf, perfect for that Starbucks iced drink, and the water bottles with the locking cap. These glass bottles are on amazon friends, and the cheapest I could find was a four pack for $9.99, which puts us at $2.49 a piece…and here they were waiting at the Dollar Tree to be snatched up for just a buck.

Bring your own cup into Starbucks and you’ll get $0.10 off.

I know, I know. I said I was staying away from plastic. While I don’t recommend these cups, if you can’t splurge on a nice ceramic travel cup for now this may be your best option. Dollar Tree offers these, as well as a full plastic version. Since we have that particular version at my hospital in the break room, I’ve already tried them and know that I HATE THEM. When hot drinks are brewed into the cups via the Keurig (which I also hate and refuse to use without my reusable filter) the plastic heats, and I swear to the Gods above and below I can taste that plastic. Disgusting! So I deliberately avoided picturing those and snapped a photo of these instead. After close investigation, the plastic looks different in terms of texture and thickness. I can’t promise the same won’t happen with these, but lacking any other travel coffee cup alternative I wanted to at least give an option.

Wet bags for used napkins and cutlery can be found among this box of pencil pouches!

I know, right now you think I’m stretching…but this box did contain waterproof plastic pouches that were perfect for holding dirty napkins and used utensils. We had to dig, and we had to test the bags we found, but they were in there!

No excuse to use paper in the kitchen!

We have had a paper free kitchen for many years. This means we do not use paper towels. We keep a bucket of dish towels, a bucket of rags/cloths, and a bucket for dirties under our sink. Every few days, the dirties get washed and everything gets returned to their baskets to be used again. I was surprised to find these really nice Bar Mop Dish Towels and Microfiber Wash Cloths at the Dollar Tree among the other options they had. These would be a great investment in starting your own transition to a paper free kitchen. Bonus shot of my towel set up below.

My paper free kitchen system: Bucket of towels, bucket of rags, bag lined bucket for dirties to be washed every few days. No need for paper towels!
If you just really want something that absorbs liquids like Bounty.

I am considering this shammy a good alternative for house holds who use paper towels to clean up frequent spills. It could be reused endlessly, and it promises to absorb 5 times its weight in liquid. I can’t promise you it works, but for a dollar it is worth a try.

Stylish glass jars and dish soap bottles

I though these little jars were adorable for spices, and the vinegar bottle makes a great soap bottle for DIY soap, which is exactly what I bought one for.

Plenty of glass storage options.

I found a few options for storing food. Some of the jars are smaller than I’d like, so they’d be great for lunch use or for smaller family kitchens where maybe you don’t need a gallon sized mason jar to hold half your broth for the week. The jars are relatively attractive for on counter storage, and the jars with the handles can be used with lid attachments that will convert it into a straw cup.

Big jars do exist!

I found a small selection of bigger sized jars hidden under these adorable lidded storage jars that could be used to hold reusable cotton pads or other beauty needs. I recommend just re-purposing the jars you get from your food purchases, like sauce jars, and pickle jars. I am a self-professed lover and hoarder of all kinds of jars, I think it is the southerner in me that has made my love affair with mason jars. I like the mix-match appearance of different jars, and could care less what the lid says. If you care about plain lids but can’t splurge on a case of mason jars, grab these.

And that is it, folks. These were the best treasures I could find for you to start your journey on a tight budget. Your only limitation on how to find ways to make these items work in your home is your imagination. I use jars to store broth, vegetables, left overs, dry beans, rice, powders, reusable cotton pads… the list goes on and on. I am often found carrying my lunch around in a reusable shopping bag, or I can be found with a big blue ikea bag stuffed with food and water bottles whenever we take the kids somewhere. I’ve been known to turn old painters canvas into reusable dryer sheets, and will absolutely keep an empty spray bottle until I can find something I need it for. There is endless creative thinking in transitioning to a zero waste lifestyle, and that extra effort to look at something and think how else you can use it makes a big difference in reducing the amount of trash we produce on a daily basis. I won’t go anywhere without my reusable water bottle, I’m now carrying straws and cutlery in my purse, and have taken my own up into Starbucks every single time I’ve stopped in in the last two months. You can do this, and you don’t need expensive things to do it with! The first step begins with you, and if you do need to pick up a few things, the Dollar Tree is probably the best place to start.

Cheap and Easy Cleaning Products That Actually Work!

I started making my own cleaning products, and if you want to save money you will too!

If you missed it, I recently told ya’ll to quit throwing your money away! In that recent post I went over how I’ve been baby-stepping my way into zero waste living. My goal isn’t to be 100% zero waste (hold off on throwing the tomatoes at my head please!) because I know it is not possible for my family, but my goal is reduce our waste as much as possible. This transition into a zero waste way of life brought me right to the DIY cleaning product doorstep, and I didn’t just knock on that door, I kicked that motherfucker down.

For years I had been researching various cleaning products to start DIY’ing because I was tired of paying for them. Due to a family rife with skin sensitivities, allergies, and asthma I was stuck in a very small circle of options. We needed Free & Clear Laundry detergent, but not just any brand because we could react to that too. Dish soap made by no less than three eco-friendly brands, because hives were a free bonus from using any other product. Granite cleaners that actually cleaned the fucking granite and didn’t leave streaks were a rarity and still left me a bit wanting. All-purpose and window cleaners that didn’t trigger my asthma were next to impossible. As I stood in this circle I had about 2-3 brands I could use, and maybe only 1 brand that consistently worked. Those brands favored by hipsters and suburban moms that have suddenly decided they want to be kind to the planet came with a heavy price tag and required a trip to a specific big box store a mere 45 minutes one way from my house.

The problem was that many of the DIY options looked complicated or required special products I wouldn’t be able to find. Some required special dishes to make it in because the ingredients were basically toxic. Yuck! Some contained items that I already knew we’d react to so those ever Pinterest-popular cheap and easy recipes went right out the window. I knew that there were a few house-hold items I could use to clean already, like vinegar and baking soda, and I knew of a few powerful Dawn dish-soap cleaning combos (which happens to be my favorite way to clean a tub!) but it wasn’t solving my big ticket problems. Fortunately though many of my life experiences, I’ve learned that if I’m persistent enough and just keep READING, I’ll find a solution.

But why make my own cleaning products? Well, I can’t speak to what your motivations may be that have brought you here today but I can sure tell you mine:

#1. Produce Less Waste: Every week I’m tossing all kinds of plastic bottles into the recycling without a care in the world. That was until I learned that plastic is the least recyclable product we consume daily. It can be reused maybe up to three times before it is totally done for, and some plastics can’t be recycled at all. I was equal parts horrified, disgusted, and resentful. One of my goals in going zero waste was to consume LESS single-use plastic and this was an essential step on that journey.

#2. Save Money: I decided recently to leave that big job that was paying me decent money after a lot of contemplation and a health scare. I resumed mostly full time work at my practice and knew I’d be taking a pay cut but not willing to sacrifice my trips to Universal. I began looking for ways I could cut our biggest household expenses and making my own cleaning and laundry products was our biggest non-food household expense.

#3. Health: My wife’s skin condition has been flaring up more frequently and generally after a few months or sometimes a few years of using a product, she will ultimately begin to react to it. We had run out of laundry soap options. We were running out of dish soap options, and we were about to run out of cleaners that didn’t give me vicious headaches and make it hard for me to breathe. I wanted to create products that were as friendly to us and the planet as possible.

I wanted to take a moment to reflect on these reasons for converting to a DIY lifestyle, because it will take some time out of your month. If you don’t have the patience to shred soap, cook soap, or combine ingredients at the cost of a few hours of your entire month then this isn’t for you. I spend maybe 3 hours total a month making my cleaning products (That’s assuming I need to shred soap as that takes the most time.) and if you are not appropriately motivated then you’ll just backslide to paying a company for the convenience of doing it for you. You’ll also be paying for their packaging, the middle man mark-up, the marketing, and the CEO’s private jet. I’m going to go ahead and tell ya’ll that if you haven’t figured this out you need to wake up. Consumerism only benefits the wealthy. So knock it off.

I’m happy to share the recipes that I’ve landed on, that I feel work the very best after a few months of experimentation. I have been playing with Dishwasher Detergent off and on for a few years and I’m sorry to say after probably 6 failed attempts, I’ve yet to find something that works. Equally frustrating is Dish Soap, but I think I finally figured it out. I have not included floor cleaners because floors are complex. As I have marble in my bathrooms, I just use a warm wet cloth to clean them. For the rest of my house it is hardwoods, and I am in the process of developing a recipe so stay tuned.

You’ll find that when you start making your own products, you don’t need to keep an arsenal of supplies anymore. One item may do the trick of three! Due to this, I’ll be notating each product that can do additional work.

Granite Cleaner (Also works as: Glass Cooktop Cleaner)

LOOK AT THAT SHINE!

A DIY Granite Cleaner formula was nearly the death of me. I searched and searched for recipes but kept coming up short. I’ve used every name brand product but they still left a residue behind and my counters always looked a touch dull. Then I finally landed on a recipe by One Good Thing By Jillee and I tweaked it by adding essential oils. Thank the gods for Jillee because this is the best granite cleaner EVER! This cleaner ALSO works on glass cook tops! If your cook top is very dirty, you may want to scrub with soap and water to remove residue first.

RECIPE:

  • 1/4 cup Alcohol (I use 70% medical alcohol)
  • 3 drops Dawn Dish Soap (I use Great Value’s version, it’s a perfect generic equivalent)
  • Water
  • 15 Drops Peppermint Essential Oils

Combine alcohol, soap, essential oils in a spray bottle and fill with water. Give a shake and you are ready to go!

Window Cleaner (Also works as: All Purpose Cleaner)

Cuts through dirt like a tornado!

Let me just say, I love this stuff! I’ve known for years that you can clean windows and glass with Vinegar, but after using Method’s glass cleaner I got spoiled by the wonderful mint scent. When I discovered this recipe, I realized that I could just add my own mint scent in and have a copy-cat formula instead. Thing is, this is way better than Method’s glass cleaner, because it actually does double duty as a wonderful all purpose cleaner. I discovered this stuff cuts through dirt on walls without damaging the paint when I was in a pinch for an all purpose cleaner and decided to give it a try with my glass cleaner. I love this stuff and it makes the house smell amazing.

RECIPE:

  • 1/4 cup Vinegar (I get the big jug of Walmart’s Great Value brand)
  • 1/4 cup Alcohol (I use 70% medical alcohol)
  • 1 tbsp Cornstarch (I use Walmart’s Great Value brand)
  • 2 cups Water
  • 20 drops essential oil (I use Peppermint, but you can use any scent you like)

Combine all ingredients in a spray bottle. Give a good shake before each use to re-constitute the cornstarch. DO NOT USE on granite or marble. Can be used on stainless steel (I haven’t yet because I’m still working through my last two bottles of stainless cleaner.) I do add more essential oil than the original recipe because I want to really smell it. Feel free to adjust to your own liking.

Liquid Castile Soap

Easiest thing to make EVER, minus all the extra junk they shove into the pre-made product.

I was delighted to discover the wonderful world of castile soap. My lack of awareness that this soap existed was what prevented me from moving forward with laundry detergent for so long. Not that I remember the series of rabbit holes I went down now but somehow I discovered castile soap and all if its amazing uses. Liquid castile soap seemed to be the ticket to DIY laundry detergent but it was stupid expensive and came with a ton of single-use plastic. Then I discovered this amazing person at Back Door Survival who had been making her own liquid castile soap out of the bar form. I then went to Amazon reading reviews on this brand to determine if we could use it for all of its hypoallergenic promises, and happily ordered a ridiculous amount of it. Kirk’s Castile Soap has an almost imperceptible very soft clean scent and has not aggravated anyone’s skin! This soap is the gateway to many products as it is used in my dish soap, laundry soap, as a general cleaner, and my son and I are even using it in the bath. You will need a grater, a pot, and a wooden spoon to cook your soap. You do NOT need special items dedicated to this soap, because it is so safe. Just wash your dishes when you are done and resume using it as normal.

RECIPE:

  • 1 bar of soap, shredded
  • 4 cups water

Bring the soap and water to a boil and stir until soap is dissolved. Transfer into jars. *When storing overnight or in cool temperatures you may find that the soap returns to a gelatinous semi-solid form. This is because the melting point of coconut oil is 76 degrees F. Just run under hot water and give it a shake to return to liquid state.* I just take a day and shred a bunch of soap and store into an old laundry detergent container. I then cook several batches of liquid soap and store in mason jars. One quart sized jar holds four liquid cups of castile soap. You’ll get 4 cups of soap out of 1 bar! Since this product is the main ingredient of my most frequently used cleaners, I like to have the prep done so I can remake a new batch of whatever I want quickly. A little prep goes a long way! PS: I got tired of shredding one day and tried to bribe a child $10 to shred. After 3 minutes of shredding, she told me she really didn’t want $10 and left.

DIY Liquid Laundry Detergent

My favorite laundry detergent ever!

Laundry detergent was my biggest obstacle in the DIY arena. Once I discovered Kirk’s castile soap, it was the basis of all my next searches on the interwebs. I landed on a recipe by Homemade Ginger which appeared so simple and easy it was almost too good to be true. I ran my test batch on dog blankets, figuring there was no better trial by fire. The detergent sailed through its test and became an immediate favorite. Since many people worry about use in HE machines, here is my disclosure: I use an HE agitator top load machine by Maytag. Maybe YMMV by machine, but mine is designed to tolerate industrial grade washing while being as gentle on the planet as possible. We wash in tap cold, and have had no problems with the soap rising clean. We pour right into the machine onto the clothes and let it wash. I have not seen it clump or clog my machine. If you are worried, use warmer water. You will need an empty jug to fill with your detergent. I use an empty one gallon vinegar jug because I didn’t have an empty laundry soap jug. If you have an empty laundry soap jug, it should be at least 100 fl oz.

RECIPE:

  • 1 cup liquid castile soap
  • 1 cup *super washing soda OR baking soda (*I use super washing soda because it is designed for laundry and is a more alkaline cleaner that can more effectively remove grease and stains. Since we are a paper-free kitchen, I needed something strong to wash our kitchen towels and rags with. Washing Soda is more granular and can leave a white residue behind–to combat this, I take an extra step to dissolve it in hot water before I mix it in, as a result I have no residue problems. If don’t want to worry about it, use baking SODA but keep in mind some stains may need pre-treating.)
  • 30 drops essential oils (I purchased a big box of oils to experiment with scent combinations I found online. My favorite is called “Anxiety Away” and it is a soft, slightly sweet clean scent. 15 Drops Frankincense, 9 drops Orange, 6 drops Peppermint.)
  • Water to fill jug. (This recipe was written for a 100 fl oz sized laundry detergent jug. I determined the 100 fl oz mark to be right where my vinegar bottle’s label began at the top.

*If using SUPER WASHING SODA: Mix 2 cups of very hot water with super washing soda until dissolved, pour into jug first. (If you’ve chosen baking soda, just pour in as normal without water.

Pour in Castile soap. Add essential oils, fill with water and shake until mixed.

I give my soap a good shake each time before pouring to just reconstitute the ingredients. The scent is very soft, if you’d like a stronger scent I’d recommend increasing the oils by double.

DIY Dryer Sheets

Some rags and a jar is all you need!

We found that our towels were a little stiff without our fabric softener so I decided the most economical way to make a fabric softener would be via reusable sheets. I had some reusable paper towels floating around and some old painters canvas I needed to get rid of. I cut everything into roughly 8×8 squares and found an old basket to hold the used sheets after they came out of the dryer until they could be put back into the jar with the softener solution. This solution does soften the towels, but doesn’t have a strong scent. To increase scent, just increase you essential oils.

RECIPE:

  • 1/2 cup Water
  • 1 1/2 cup Vinegar
  • 8-16 drops Essential Oils (8 being low, 16 being strong)

I use two sheets per load, so we go through my little jar pretty quick. I keep an extra jar of pre-made liquid on hand so I can just stuff the rags back into the jar and top off with liquid when it gets low.

DIY Dish Soap

Yes, you can make anti-bacterial dish soap at home with a little help from Tea Tree Oil!

If you saw it above, you know that finding a dish soap recipe was very frustrating for me! I must have read 50 different recipes and tried nearly as many. My difficulty may have come from wanting to stick to a castile soap based product. Honestly it would be just as easy to rub a bit of the whole bar onto a rag and wash my dishes that way, but I prefer a liquid and there is no way to add grease fighting properties or anti-bacterial properties to a bar of existing soap. After being frustrated by my first weak batch, my second overly pungent batch, my third slimy batch, and my fifth batch that just kind of became a solid I was ready to throw in the towel on castile soap and purchase the expensive single-use plastic bottle of Sal’s Suds I saw yet another recipe recommend for DIY Dish soap. Fortunately, when all hope seemed lost and the night was its darkest, I stumbled down my wayward path and found this gem beckoning me home.

RECIPE:

  • 3 TBSP grated Castile Soap
  • 1 tsp Washing Soda
  • 2 cups Water
  • 15 drops essential oils* (Recommended blend: 5 drops Eucalyptus, 4 drops Lemongrass, 4 drops Lemon, 2 drops Tea Tree Oil)

Heat water on the stove and mix in the castile soap, stirring until melted. Remove from heat and transfer into a glass bowl or glass jar. Add washing soda and stir until mixed. Set aside and let sit until next day. The following day, mix and add your essential oils. Pour into dish soap vessel and use as normal. (It is not recommended to make large batches of this soap as it has a tenancy to congeal and/or separate.)

*A note about essential oils:

Tea Tree Oil is a natural antibacterial oil and promising studies are showing that it can even kill MRSA. If you have meat in your kitchen, or worry about germs you probably want your dish soap to be antibacterial. Tea Tree oil is a great option to add to your soap. However, Tea Tree Oil is TOXIC TO PETS. I am a veterinary professional and regularly hear clients say they put this on their pets to treat fleas. Just 7 drops of Tea Tree Oil can kill your pet depending on their weight. Please do not use any soap products containing tea tree oil ON your pets, and be sure your hands are thoroughly washed clean of your soap before touching pets. If you are just like my clients and don’t believe me, please read this article from the Animal Poison Control Center.

Citrus Oils (Lemon, Grapefruit, Orange) are great natural de-greasers and can be added for some oil fighting power. Plus they smell amazing.

But how much are you saving?

I broke down the math on this in my Quit Throwing Away Your Money post as I chatted about our transition to Zero Waste. And since I’ve literally been working on this one post for the last four hours I’m going to be lazy and copy/paste that information over here.

My monthly cleaning product spending before:

Method Counter Cleaner: $3.29

Method Granite Cleaner: $5.99

Method Window Cleaner: $3.29

Weiman’s Cooktop Cleaner: $3.96 x 2 a month = $7.92

Method Dish Soap: $4.99

All Free and Clear Laundry Soap Pods: $9.97

Downy Infusions Amber Blossom $6.94

Total Products = $42.39 for one month + $4.20 sales tax = $46.59/month Which is a total of $560 a year in cleaning products and endless bottles of plastic that can’t be recycled more than once or twice?! Fuck that!

My monthly DIY cleaning product spending after:

1.Kirk’s Castile Soap Bars x 48 = $57.95 ($1.21 a bar) purchased on Amazon. (I shred and cook this soap into liquid castile soap. 1 bar makes 4 cups of liquid castile, which is the basis of every natural cleaning product you can think of. You can also use this soap to clean your own body and hair which is my long term plan with some further research on how it affects dyed hair. MG dyes her hair purple as of May my hair is now rose gold, I’m not having my purple rose gold dye leach out. Fuck that. MG needs more research.)

2. 70% Rubbing Alcohol x 6 32oz bottles = $17.55 ($2.92 a bottle which equals out to $0.09/ounce) 
purchased on Amazon.

3. Aromatherapy Oils 20 Count Variety Box = $29.72 (there are cheaper ways to buy these oils but I wanted to experiment with scents to find combinations I liked and this was the biggest bang for my buck.) purchased on Amazon.

4. Super Washing Soda 55oz box = $4.12 (for laundry detergent) purchased at Walmart.

5. White Vinegar 64oz = $1.92 (various uses for this cleaning power house, but do NOT put it on stone surfaces!) purchased at Walmart.

Total: $112 to make a bulk purchase of DIY cleaning supplies ingredients. When shredding the bar soap to cook into liquid soap, you save even MORE money than buying the overpriced bottles of pre-made liquid. If my calculations are right, the bars will convert to 384 cups of liquid castile soap. That is over 1 year of both Laundry Soap AND Dish soap which both call for the liquid castile soap. This means I’m paying $9.13 a month for laundry soap, dish soap, fabric softener, window cleaner, and granite and class cooktop cleaner.

I’m saving $450 a year on cleaning products!

Am I feeling this savings right away? YES. I am noticing the extra money in the budget each month, and at the end of the year I’m really going to sit up straight and pay attention to it when all that extra money piles up in savings. And how did I budget this in to make the bulk purchase to begin with? I have a generous grocery budget, and any extra at the end of the month gets put into savings. I had a month with roughly $150 left over thanks to my new left-over eating system so I was able to roll that money right into the purchase of my ingredients and now I’m done for the year!

I only wish I could have had someone tell me all this years ago, just think of all the money I could have saved I had only started sooner!
So, are you ready to begin?

Wizarding World Loot Crate Review

And why I’m canceling after only four boxes.

Lets talk about Loot Crate. If you have been living under a proverbial rock and have no idea what a Loot Crate is, allow me to explain. This is a mystery box that is based on a fandom of your choice and delivered right to your door step every other month. I was skeptical of getting mystery items but had friends who were subscribed to the Firefly crate and the Wizarding World crate and they were getting some pretty epic stuff.

Loot Crate promises the following:


We pick a major event or theme from the wizarding world and put together a bundle of official collectibles, apparel and more that you can’t find anywhere else!

4-6 magical items in each crate

Exclusive and officially licensed Harry Potter & Fantastic Beasts gear

Wizarding gear to show off your Hogwarts house pride and more

$65+ MSRP value in every crate

Sounds pretty good right? Well it got even sweeter when we landed on a special deal that made our boxes half off. We had a little extra money in the budget and decided to treat ourselves to a box. Mrs MG subscribed to a Hufflepuff crate, while MG naturally opted in for a Slytherin crate. Everything was set and we awaited delivery of our geeky heaven.

September 2018: This was our first box and it blew our expectations out of the water. It included a beautiful house banner, a house notebook, a house bookmark (which I promptly turned into an ornament) , a gorgeous enamel pin, and a house messenger bag. I felt that this box had delivered on every one of its promises with custom gear I couldn’t get anywhere else, and major items for the price. We use the messenger bag at Universal Studios and get questions about it all the time. This box sold us on the subscription and we were positively filled with glee at the prospect of what future boxes may hold for us hard-core Potter nerds.

November 2018: Then came the second box, but not until DECEMBER. The boxes shipped out late for everyone because they were missing items. That was all good and well until the crate arrived It included a very meh t-shirt that had a Deathly Hallows design, the shirt itself was not the best quality and was constructed weird. I gave it to one of my children. We got another beautiful enamel pin, a miniature Mirror of Erised, a Harry Potter umbrella and four 5×7 sized prints of the Hogwarts house founders. This box left me scratching my head a bit as I struggled to determine which item was the big ticket item. I hated the shirt, I rarely use umbrellas, and I wasn’t going to hang pictures of the house founders on the wall. I decided that it would be pretty hard to follow the box from a month before, and had heard rumors that after you get a big box, you get a “dud” box, and this pattern continues as Big, Small, Big, Small, etc. This one was not my favorite box. At any rate, next month’s box was on its way with a chance of redemption.

January 2019: This box didn’t arrive until February. Why? Because they forgot about us. Keep in mind we pay for two boxes each month. I happened to be thinking about when my next crate would arrive and I asked Mrs MG if we missed our crates. She contacted the support team and they said ours were not shipped “due to a fulfillment error.” I was pretty annoyed by this because had we not contacted them, they would have never sent us anything and kept our money. I didn’t understand why if this was a known error, they didn’t post about it on social media or isolate the addresses that were missed and contact the members with an apology and a tracking number for a replacement. They promised to send Mrs MG tracking numbers but she never got them. A few days later the Slytherin box randomly shows up, but it wasn’t until a full week later that the Hufflepuff box came. Those tracking numbers? We never saw those. This crate was even more frustrating than the last. It included a Luna sleeping mask, which was designed to fit a child sized head. For the record, I thought I’d get use out of this on the red eye flights we often end up on, but it wasn’t designed to fit adults! I immediately tossed it to another one of our children. There was another poorly designed t-shirt for the Ministry of Magic, which had a strange ticket design on the front, and a double M on the back. Very boring. There was another beautiful enamel pin, some stickers from various magical locations out of Fantastic Beasts, and the big ticket item–a picnic blanket? The blanket is fleece and could honestly be a travel blanket, it could also be hung on a wall. The blanket is themed to your subscribed house, but the print on the fleece is kind of blurry and the blanket itself is really low quality. At this point, I’m complaining to Mrs MG about the crap we’ve gotten the last two boxes and she tells me we only have two more of our pre-paid boxes left to go. I ask other people how they felt about their box and it was unanimously meh.

March 2019: I can’t say how I feel about this crate yet, because it is May the 6th and I still haven’t seen my March crate. Yeah, you read that shit right. And what is even more ironic is that I’m supposed to get a crate in May as well…. So let’s begin talking about the absolute FUCKERY that is Loot Crate and their support team. In April, I again realize we never got our crate. At this time, Loot Crate put out information online that there was a shipping delay, which looked something like this:

I decided not to worry myself about it, and instead rolled my eyes. At least his time they were notifying people. We however, never saw this email. We had to go digging through internet land to figure out what was going on. They were promising to have boxes going out between 4/16 and 4/18. When that week came and went with still no tracking info and no updates, I sent Mrs MG to the task of contacting Loot Crate again because she is way more patient than I am and I was ready to say some pretty mean shit. This was the conversation she had with their support team on April 25th:

Chat started: 2019-04-25 01:23 AM UTC
(01:23:33 AM) angela hanson: I have not received shipping confirmation for my March wizarding world crates. I had purchased both a Hufflepuff XXXL and Slytherin XXL.
(01:24:05 AM) *** Errol L. joined the chat ***
(01:24:09 AM) Errol L.: Hello Angela
(01:24:11 AM) Errol L.: One moment please while I check on that for you.
(01:24:18 AM) angela hanson: Thank you.
(01:27:13 AM) angela hanson: Anything?
(01:27:24 AM) Errol L.: Sad to say we have encountered a warehouse fulfillment error from our warehouse for both crates.
(01:27:41 AM) Errol L.: But no worries
(01:27:49 AM) Errol L.: I will get a replacement out to you. Due to inventory changes at our warehouse, we ask that you allow up 2-4 weeks for your replacement to ship. Once it has been processed, you will receive an email with new tracking information.
(01:28:08 AM) angela hanson: this is the second time in a row this has happened. And I’m never notified ahead of time – I always have to contact you to find out where my crates are.
(01:28:34 AM) Errol L.: We are very sorry for the inconvenience. But no worries I have processed a replacement for both crates
(01:29:49 AM) angela hanson: this is incredibly frustrating. I appreciate you arranging to send the crates I’ve paid for. But the reason that I purchased the 3 month option was so I didn’t have to think about them and could just be happy when they arrived. Now every time I’m having to contact you to find out what’s going on.
(01:30:22 AM) angela hanson: Why can’t LootCrate send a notification to those that are affected with an estimate on when they’ll go out?
(01:30:32 AM) angela hanson: just a suggestion.
(01:31:14 AM) angela hanson: honestly this is so frustrating to me that I highly doubt I’ll be renewing my loot crate subscription when it expires.
(01:31:19 AM) Errol L.: We truly apologize for the inconvenience. I can promise that we are working to update and improve our procedures and protocols for shipment so that we can better avoid these kinds of issues in the future. I have likewise passed your comments along to our management, merchandising and fulfillment teams, respectively, for further review and consideration.
(01:32:13 AM) angela hanson: i appreciate that. And I understand that you don’t have control of this. I just want management to understand how frustrating it is when this happens consistently to customers. I truly appreciate you passing my comments along
(01:32:29 AM) angela hanson: I’ll look for the new shipping notices to come.
(01:32:46 AM) angela hanson: thank you for taking care of this for me.
(01:33:02 AM) Errol L.: We truly appreciate your patience and understanding
(01:33:04 AM) Errol L.: Is there anything else I can assist you with?
(01:33:29 AM) angela hanson: no thank you.
(01:33:45 AM) Errol L.: It’s been crate chatting with you!

For anyone who is counting, it has been a week and a half and we still have no updates from Loot Crate. On May 5th, Mrs MG decides to contact them again:

And while we were waiting for the ticket to be answered, Mrs MG took to Twitter…

The ticket and tweet was followed up today by yet another request from support, and it is still radio silence. This is three straight delayed shipments. This is two shipments of being told we were missed due to a “fulfillment problem” and now we have been disregarded and ignored completely. We are paying customers, they already have our money but are withholding our goods. Because of this lack of efficiency, lack of follow through, and my utter lack of trust in the company, we will no longer be purchasing loot crate items or recommending them to others. I’m not sure I’ll ever get my March box, and we are so significantly delayed on our March box we’ve rolled into May, the very same month that our last box is supposed to ship.Will either of them arrive? Probably not–but maybe this will stop other people from being taken advantage of. And in that spirit I decided to google them and their shipping issues, what I found was a list of 434 complaints against them on the BBB website! I was surprised to see so many people had been experiencing the exact same frustrations we have been.
Loot Crates issues aren’t isolated and this isn’t a growth problem. I did some more googling digging back as far as 2012, and they have made the same statements about the same problems with missing people and delayed shipping. I think for the most part, Loot Crate is a gigantic scam. Their promises to deliver $65 worth of product in every crate is a joke. Their products are chintzy, and a lot of people are missed all together which is just straight profit in the pocket for the company as they’re benefiting on the people who may have forgotten about their order all together. Does ripping people off really line up with the Geek culture? Does that seem right to you?

Now, lets say that shipping wasn’t an issue, would I recommend the crate? I want to say yes, because that September crate was out of this world good, but I have to say no. The majority of crates just included junk I didn’t care about, poorly designed t-shirts, and items of questionable quality. I gave away many of the things that were included in my crates, and what the fuck is a 34 year old adult going to do with some fucking stickers of the French Ministry of Magic? I don’t even care about that Ministry. I see things in Hot Topic and Box Lunch I like all the time, and with the money I spend on Loot Crate I could just buy one of those things I actually liked at the mall. So I’ll just say this, keep your money, save yourself a headache, and take a pass on Loot Crate.

Quit throwing your money away!

How my transition to zero waste has saved me thousands so far.

You are being hustled. Plain and simple.

I see you there, in the isle of cleaning products carefully selecting the next failure that will leave streaks on your stone counters, or that over-priced brand of laundry soap you have to use because you’ve got a 4:1 ratio of sensitive skin people in your house. I see you contemplating which cleaner will smell the nicest without giving you a headache, and I also saw the giant package of paper towels in your buggy as you stood pondering.

I saw you, because I too once stood in those isles. Like you, I once strode to the isle of cleaning products searching for the one brand of cleaner that left my granite counters shiny–only to find anguish that it was no longer being produced. I stood beside you grabbing my free and clear detergent because my wife has a skin disorder and I’m allergic to nearly everything under the sun. I reached past you as you grabbed for a giant bundle of paper towels in search of yet more rolls of toilet paper my children would eat or feed to gremlins. (I mean–how does it go so fucking fast, anyway?)

But I’m not standing in those isles anymore. In fact, I don’t even go down there. My house is cleaner than ever, it smells better than ever, and I’ve got way more wiggle in my grocery budget than I ever did before. Sit down for a spell and I’ll tell you the story about a girl who is perpetually tight-waded and you might learn a thing or two.

14 Years Ago…

“What the fuck is the point of diapers.” – Me, standing in the diaper isle of the grocery store.

This is when I feel my frugalness really began to skyrocket into the amazing machine it is today. For years we were broke, and I was feeding my family on an incredibly low budget that still left me sacrificing much. I used to loathe the inevitable month end “re-stock” trip that would have me purchasing laundry soap, dish soap, cleaners, toilet paper, razors even. In those days, I had to give up on bigger things just to make sure the household had all it needed. My rules were simple: Food first, then bills, then any pennies left over could maybe get me a pair of new jeans at the local thrift shop. My thighs had just worn a hole in the crotch again.

If you were wondering, I ended up cloth diapering and I remain a loyal supporter of the cloth movement.

Years later, I finally begin to get the picture. I was being exploited. I didn’t have the ability or knowledge to make any of this crap myself, and because I had allergies I had no choice but to spend the mega bucks on the over-priced brands of everything. Because I had asthma I had to be incredibly careful over which cleaning supplies I could use and not die. Because I had survived the H1N1 (Swine Flu) epidemic of 2009, I desperately needed all the disinfecting stuffs to protect my kids.

It’s all pathos, my friends. If I didn’t buy these things, my kids would get sick, my house would be in shambles, and I ran the risk of dying from an asthma attack or ripping myself apart from hives. Still, I remained trapped in the marketing and consumer machine that was purchasing the basic necessities of the household until my recent awakening.

About a year ago, I began listening to a podcast called, “By The Book” which featured two awesome chicks living by various self-help and life improvement books for two weeks and talking about how it did or did not change their whole world view. They did a podcast on a lifestyle called Zero Waste living. I consider myself to be a bit more eco-friendly than the average bear so I listened along. I was intrigued and a bit beguiled that such a lifestyle could really help me make an impact on the planet for the positive.

However, upon further research, I was immediately overwhelmed. Going Zero Waste seems monumental and impossible at first glance. It is also substantially guilt inducing much in the same way as going vegan is. You’ve contributed so much to this monster that is making our planet decay and it just makes you cringe and die a bit on the inside. If you don’t have the chops for it–you get angry and retreat; but if you are like me, you grieve your past ignorance and begin looking for ways to make a transition.

We’ll never be the people that can fit all their waste for an entire year into a mason jar. We’ll never be a “Family Cloth” family either. I’ll never stop traveling, so I’ve totally fucked the Earth with my airplane emissions, and I can’t afford a hybrid mini-van. But there ARE things I can control, like packing my own silverware, and reducing my use of single-use plastics. If we all just focus on what we can control, we can make a big difference.

Now that we’ve done the big touchy-feels and saved the Earth, let’s talk about what your primary motivation should really be here.

Saving all the green…

I’m talking about DOLLAR, DOLLAR BILLS YA’LL! The BIGGEST benefit of going green is saving all the green! I’ve made small changes to our family that have already saved us hundreds and thousands so far.

Yes, yes…saving the Earth is all good and well. But I’m not going to be ashamed for saving MONEY being a motivator. I mean, that’s saving trees too–am I right? You’ve heard of economic vegetarians, I’m sure. I’m introducing you to economic zero wasting. And as I don’t think that actually exists yet, I’m going to say right now that I copyright it. So sod off my IP.

Here are some baby-steps we’ve taken to go zero waste by eliminating the following items, and how much money it has saved us so far. Total transparency, I’m including our “start up” costs to convert to a zero-waste life, as some aspects of this life do require a transition to a different product.

Paper Towels: This is probably the big ticket item that has driven our money savings up over the thousand dollar mark alone. Years ago, we went sans Bounty in the kitchen. We spent around $20-$40 a month in paper towels alone, and where were all those discarded towels ending up, anyway? In the trash! Now this was way before my “zero waste-awakening” as I am calling it these days, but I’d like to say it was the gateway drug for us. We replaced paper towels with a variety of rags, tea towels, and dish towels. We have one bucket for towels, one bucket for rags, and one bucket for dirties all stored under our sink. We toss them in the wash every few days with our regular bathroom towels.

Cost: Nothing–we already had these towels and old towels to be turned into rags in the house

Savings: $480 a year x 5 years = $2400

Plastic Wrap & Plastic Bags: I like to call this the silent killer to your budget. You buy a few rolls of this every shopping trip and use it to wrap up everything. I found it was especially useful for when I was missing a lid to a plastic container. This was really easy for us to phase out. I invested first into a new set of Glad plastic containers; they’re cheaper than a complete Tuperware set and I only bought a few sets of large and medium bowls. I then swapped plastic for aluminum as it was able to be recycled for a few years. I also tried using and reusing plastic bags but I loathed it, and plastic baggies are probably the most overpriced thing you’ll ever throw away! A few boxes of different sizes a month and your budget is already a goner! I then graduated to some silicone bowl covers (I didn’t want to use beeswax covers as I couldn’t be sure how the bee products were sourced) for any irregular shaped bowls. Honestly, those things suck and they were damned expensive. Now we just make an effort to store everything in bowls, jars, or our Pyrex dishes.

Cost: $40 on the worlds worst silicone dish covers. $20 on some Gladware containers. Jars were free through food items that came in jars. I will soon be purchasing some silicone reusable bags for use during travel. I also made my own food wraps out of re-purposed rice bags and I use them the most often!

Savings: $200 over a few years of ditching plastic bags, plastic wrap, and foil (all walmart brand products.)

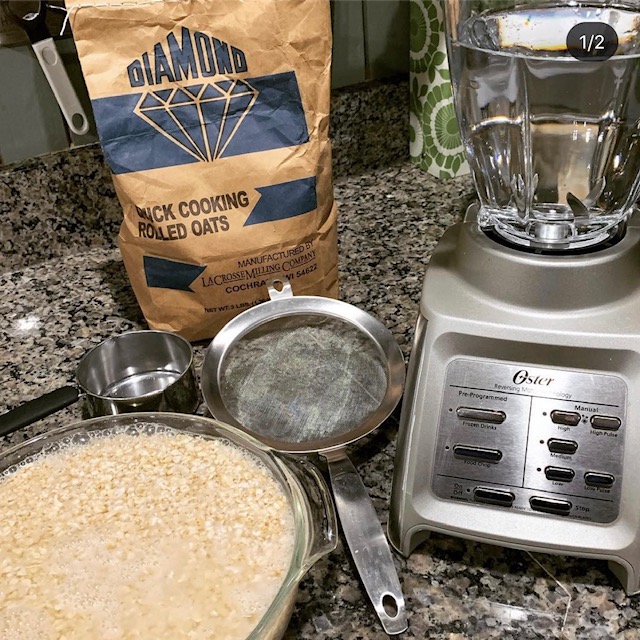
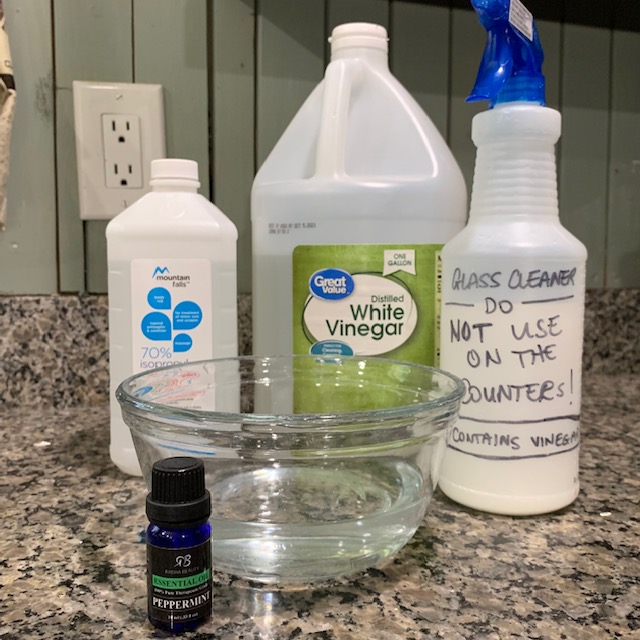
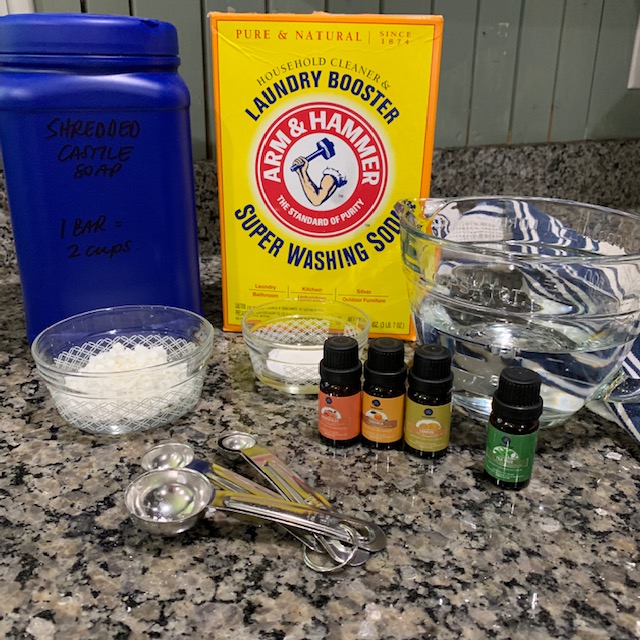
Cleaning Products, Laundry Soap & Fabric Softener: I have a confession ya’ll. MG fucking LOVES cleaning products. I don’t know why this is, honestly–but I’ve always had this guilty little secret pleasure in trying all the new products. Chances are, if it is on a shelf I have tried it and can tell you how it smells, how it works, and how it doesn’t. As a child, I grew up helping my mother clean the vacation resort properties of the wealthy. As an adult, I clean as a way to work out stress and anger. As someone who has been broke and frustrated for many of her younger years, my introspected analysis tells me that a $3 bottle of cleaner was the cheapest way to treat myself. (Don’t study psychology folks, it will mess you up. Ha!) MG doesn’t love the price tag on cleaning products though. After switching to greener brands several years ago, those tiny bottles of Method were costing me a small fortune. I tried Grove Collaborative but hated the service, so I was back to elbowing the rich suburban mom’s out of the way to grab my 4 bottles of Method to get the $5 Target gift card every other month. Recently, I’ve started making my own. I’ve been researching various recipes for years-and I’m talking YEARS to find the products that were the most simple, did what I needed to do for my home, and didn’t bother my asthma while remaining as green as possible. I now make my own glass, granite, and all-purpose cleaners, along with my own dish soap. (I’ve tried and failed on several dish washer detergents so I buy the super expensive top-tier Finish packets which seem to be the only thing that actually works in my dish-washer. That’s a battle for another day.) Here is how I made my big bulk purchase of materials. Recipes here!!!

Cost:

1.Kirk’s Castile Soap Bars x 48 = $57.95 ($1.21 a bar) purchased on Amazon. (I shred and cook this soap into liquid castile soap. 1 bar makes 4 cups of liquid castile, which is the basis of every natural cleaning product you can think of. You can also use this soap to clean your own body and hair which is my long term plan with some further research on how it affects dyed hair. MG dyes her hair purple, I’m not having my purple dye leach out. Fuck that. MG needs more research.)

2. 70% Rubbing Alcohol x 6 32oz bottles = $17.55 ($2.92 a bottle which equals out to $0.09/ounce)
purchased on Amazon.

3. Aromatherapy Oils 20 Count Variety Box = $29.72 (there are cheaper ways to buy these oils but I wanted to experiment with scents to find combinations I liked and this was the biggest bang for my buck.) purchased on Amazon.

4. Super Washing Soda 55oz box = $4.12 (for laundry detergent) purchased at Walmart.

5. White Vinegar 64oz = $1.92 (various uses for this cleaning power house, but do NOT put it on stone surfaces!) purchased at Walmart.

$112 to make a bulk purchase of cleaning supplies I can make myself. These ingredients can make: Laundry Detergent, Fabric Softener, Window Cleaner, Granite and Glass Cooktop Cleaner, Dish Washing Soap. When shredding the bar soap to cook into liquid soap, you save even MORE money than buying the overpriced bottles of pre-made liquid. If my calculations are right, the bars will convert to 384 cups of liquid castile soap. That is over 1 year of both Laundry Soap AND Dish soap which both call for the liquid castile soap. This means I’m paying $9.13 a month for laundry soap, dish soap, fabric softener, window cleaner, and granite and class cooktop cleaner.

Savings: $450 a year (breakdown below)

I’m going to compare my savings to the exact brands of products I used before switching to my own cleaning products. My prices may be higher than yours–keep in mind, we have severe allergies and asthma in the MG household so we can’t use a lot of the cheaper products on the shelf or we die a bit.

Method Counter Cleaner: $3.29

Method Granite Cleaner: $5.99

Method Window Cleaner: $3.29

Weiman’s Cooktop Cleaner: $3.96 x 2 a month = $7.92

Method Dish Soap: $4.99

All Free and Clear Laundry Soap Pods: $9.97

Downy Infusions Amber Blossom $6.94

Total Products = $42.39 for one month + $4.20 sales tax = $46.59/month Which is a total of $560 a year in cleaning products and endless bottles of plastic that can’t be recycled more than once or twice?! What the fuck!

Coffee Stands/Starbucks: Living in the PNW it would be the biggest understatement of all time to simply say we like coffee. Coffee is part of the culture here. We have coffee shops and drive-through coffee stands on every corner. Here in the PNW you can find 3 Starbucks within a minute walk from each other, but most of us prefer the privately owned brands and we all have our favorites. For a few years we got into the bad habit of buying coffee on a regular basis. Around here a mocha or latte sets you back around $7 a cup with a tip. More if you are ordering frozen coffee drinks or adding shots and flavors. We didn’t know how to make it ourselves or where to find the products they were putting into our coffee, so I started making inquiries. “Do you use sauce or powder in that?” “What brand of soy milk is that?” “Where can I buy that? I want some to have at home!” And you’d be surprised how many friendly baristas will tell you all about the products, where to buy it in your neighborhood, and how they make your drink! (Some recipes are chain secrets and won’t be shared.) Through this series of tough investigative work I determined how our favorites were made and where we could get the products. We now go to a local food service store and buy all of it ourselves. We actually gave up Costco completely because we can shop in bulk here without paying a membership fee! Food Service stores are usually open to the public but no one knows about them. We make our own coffee at home, and for the drinks we absolutely can’t make at home (Like the Starbucks Mango Dragonfruit refresher) we bring our own cups–they give you a small discount for that. (I do tend to favor Starbucks when I’m in a pinch and traveling because they have the most lucrative rewards system and are everywhere.)

Cost: White Chocolate Powder, Chocolate Powder, Chai Powder $15 a bag. High quality coffee beans $10 a bag (brews better coffee when fresh ground!) Coffee Grinder $8. Reusable Ceramic Coffee Cup $10 (You can find reusable coffee cups in any material, but I prefer Ceramic and use a cup by Ello.)

Subtracting my one time reusable coffee cup investment. I say that a bag of each flavoring lasts us about 3 months. Beans we replace every month. So $75 for a three month supply of custom drinks = $25 a month, divided by two people is $12.50 in coffee per person a month. One drink at Starbucks runs us about $7 each. That is $0.42 cents a cup per person per day in our household. Bonus points for not producing all those disposable coffee cups, lids, straws, and stir sticks! Plus if there is a drink I really want at Starbucks, I bring my own cup and get a $0.10 discount on my drink. I recently broke my plastic tumbler, so I’ve been bringing in my Guardians of the Galaxy “Rocket” Cup with my own straw and no one bats an eyelash.

Savings: (Ok, I did my at home coffee math for the year, because we do drink coffee or chai every single day. If we were ordering out, we would never be able to afford to drink every day, so I’ve adjusted the numbers to three times a week which seems slightly more reasonable.) For two people at $7 a cup, this comes out to $504 for three months of coffees. We’re saving $459!

Water & Drinks: We are a family of five that travels a fair bit, including an every week hour + drive that would always result in kids complaining they were thirsty. Even stopping and grabbing the cheapest waters at a gas station is $5, and then there is all the plastic that now needs to be recycled. About two years ago, I purchased one of those Coleman drink cooler jugs at a thrift store and our entire way of life changed. We now take that thing with us on every single trip, filled with ice water. No matter if it is 30 minutes or 3 hours. We fly with our own water bottles, run errands with our own water bottles, and go on vacation with our own water bottles.

Cost: The Coleman Beverage Cooler we picked up at a thrift store set us back $3. It will cost you a whopping $15 on Amazon. Think about that, you can carry 1 gallon of water with you indefinitely for a small one time investment. You might even be able to find one at a thrift store like I did. We also purchased everyone in the household their own water bottles. This can get complicated as Mrs. MG and I don’t like metal bottles, and we dont want to carry heavy glass with us everywhere. Mrs. MG carries a Contigo brand water bottle and I use an old one she had in storage and never used. We bought the kids these 2.2L bottles that are only a few bucks at Walmart and are BPA free with a safe plastics code for their car water. (They carry different bottles at school.) I recommend checking out Ross, Marshalls, TJ Maxx, or any other similar discount store for water bottles. They’re the cheapest and generally have a wide selection of styles. We spent about $22 on water bottles. On the rare occasion we want soda, I’ll pick up a 12 pack and keep it in the trunk. Still a lot cheaper than buying 1 bottle at the gas station and the metal can is a better item to recycle than plastic bottle.

Savings: We were purchasing several drinks a few times a week. It would be insane to even attempt to add this all up, but I know that we’ve saved hundreds of dollars by bringing our own water jugs.

Pet Care: We have 3 cats, and 2 dogs, but I’m going to talk to you about the two big changes we made with our cats that have helped us produce less waste. #1, type of cat litter! We were using a system by Purina that used pee pads and special pellets in their uniquely designed box when we had one cat. We could scoop the poo into the toilet but the pellets and the pee pads always went into the trash. Pretty wasteful, but I never stopped to think about any other way. When we got our Persians, our breeder told us she uses a corn based litter. This is where things began to shift, I had no idea they made litter out of corn, then discovered they even make it out of recycled walnut shells too! We transitioned all three cats to a walnut shell litter. This litter is totally biodegradable and can be flushed down the toilet. No more plastic bags with old pellets and pee pads going into the trash. We just scoop, then replenish the litter. The second big change we made was in cotton pads. Persians have to have their eyes cleaned every day. I hated throwing away the cotton balls, but knew a wash cloth wouldn’t be gentle enough for them. One day on Pinterest I stumbled across a zero waste blog where the key picture was of reusable cotton pads. I purchased some on Amazon that day. Now we just toss them in the wash with our kitchen towels and use again when dry!

Cost: New litter boxes $3 each x 3 = $9.00. Our litter is about $20 for 25 lbs. This lasts us about two months, and is not producing any waste. Our old systems were totally disinfected and donated to a local rescue. Reusable cotton pads $8.00. We were spending about $15 a month on the old litter system so we have about a $10 every two months savings on the new system but our biggest motivation was reducing waste. We chose the walnut because after a trial run of corn, I couldn’t stand the product. It doesn’t trap the odors and doesn’t clump well. Walnut clumps the firmest and does the best job with controlling odor. It is still more expensive than the traditional clay litters, but this is a better environmental choice. Reusable cotton pads $8.00 vs. $5 a bag every month.

Savings: Litter: $60 a year. Cotton balls: $52 a year.

Trash Service: Yep. I went there, but quit freaking out! It isn’t like I’m telling you to be like the people who can fit 10 years of trash into a mason jar for fucks sake. I’m just talking about really taking a hard look at what you are paying for on your trash service. We are a family of five and had the big trash can and one recycle can. We found that we filled our recycle can much faster than our trash. I called our trash company and asked for an extra recycle can and they said, “You can’t have an extra recycle can, but you can have another trash can.” WHAT?! I was pretty angry that they wanted me to produce more waste instead of more recycled material. So after a few heated words, I hung up and decided that we’d just take our extra recycling to the recycling center instead. As I began this transition, I started thinking of what I was actually throwing away. Most of our trash is parts of fruit/vegetables we don’t eat, any leftovers that we didn’t get finished in time, and the vegetable scraps I had already boiled down for broth. This led me to composting. I was a little intimidated by it because frankly, reading and researching online led me down a rabbit hole filled to the brim with a bunch of conflicting opinions. Then there was the expense of making your own system or buying a system, then came the research into each avenue. Ultimately I decided on a simple system from Amazon that was relatively inexpensive. I actually got super lucky and found the same system in my local thrift store and paid only $10 for two of them! Now that we are composting, we are very careful about sorting our trash. I’ve also been semi-obsessively revamping the way I shop. I’m picking products that come packaged in recyclable materials. I’m avoid products packaged in plastic. I’m trying as much as possible to avoid items packaged in materials that are not recyclable at all (like the mesh bags apples come in). What absolutely can not be composted or recycled then goes into the trash and it wasn’t that hard to teach our children the new trash/compost/recycle rules. Now we produce about 4 gallons of trash a week, if that. After a few weeks of this level of production, we ordered the small can from our trash service and it is still way too large for us! We’re going to begin requesting once a month pick up trash service instead of bi-weekly. All of these changes has brought our trash bill down in a significant way.

Cost: Composting bins from Thrift Shop $10. Organic matter and paper for composting, free.

Savings: At this time, we’re still waiting on our trash bill to stabilize. We have a credit and we’ve been making changes to our service so it is difficult to say, but I know we’ve saved at least $15 a month by swapping the cans. The compost is saving us money as well by becoming rich organic nutrients for any gardening we may decide to do. Our plan is actually to allow our neighbors to grab some whenever they need.

Thrift Stores: If you aren’t shopping second hand, what are you even doing with your life? I have been a bonafide thrift store junkie for my entire adult life. When I was a brand new young adult and newlywed I relied heavily on the thrift store in our little town to get the things I needed. We lived overseas and my choices were the expensive military department store or our military thrift store. I was so obsessed, that I even worked at that shop! My obsession remains to this day, having had three kids I nearly always start any clothes shopping at the thrift store. Kids grow so fast, many of the clothing I find is brand new and has maybe been worn once or twice. I look for clothing and scrubs for myself (though more often than not I strike out on clothing due to my size) before I head to the mall. I also stop in when I have a list of planned purchases to see if the thrift store has it first. Why? Because A, the thrift store is going to be cheaper, and B, it reduces waste! I donate or give away everything we no longer need/use. (I’ve tried selling things before but I just get frustrated with it. If the price is $2.00 why in the hell do you have to feel the need to haggle me down to $0.45? Just pay the $2 bucks!) These items still have plenty of life in them and could benefit someone else. This is the entire premise of thrift stores, and I’ve found the exact thing I’m looking for more times than I can count! Recently I picked up a $70 blender for $15 bucks! I found a mountain bike and drifter bike both brand new that were hundreds of dollars each for only $25 a piece at the thrift stores which were immediately purchased and given to the kids as birthday gifts. I was thrilled beyond measure when I found a $50 board game I’d wanted for years there still in its original plastic for only $5 because the corner of the box was dented. I’m currently lounging in my $80 Ikea chair that was only $19.99 at the thrift store. Not only am I saving money by purchasing gently used items, but I’m helping prevent these things from ending up in a landfill. I’m not recommending you buy everything at a thrift store, some things should just be purchased new. (Mattresses, underware, socks) I only recommend that for any other purchases you are planning that you start at a few thrift stores first before buying it new. I can’t give you a cost/savings break down on this one–but know that thrift stores benefit everyone and the planet!

Save that money!

I know this sounds like a ton of work. You are probably thinking I’m some kind of stay at home wife who has a ton of time in her day. I’m not. I work a full time job, I’ve got special needs pets, and three children, plus a wife that needs some of my attention sometimes. These changes were brought in gradually and developed over time. It seems crazy, but you might remember a grandmother or aunt doing these things. That is because the Great Depression taught an entire generation how to be frugal, how to reuse things, how to do it yourself, and how to re-imagine things.

The vast majority of our purchases when it comes to food and household items are designed to be as convenient as possible to us, and we are paying a steep premium for having other people chop our vegetables, making our soap, and designing items that can be thrown away after one use. Once you start doing these things yourself, it becomes second nature. Chop up your veggies after you get home from shopping and put them away already prepared for the week. Throw your reusable rags into the wash when you wash your bathroom towels. Instead of throwing all your egg shells and banana peels into the trash, put them into your composting bucket and dump it into the pile once a week, make your laundry soap and cleaning products in big batches so you don’t have to do it as often. I honestly see a big difference in my budget every single month by taking a few minutes to do these things for myself and so will you!

I think of how I did things before and all I feel is frustration. I was played by these companies, plain and simple. There were times when we were so broke I wondered how I’d have the gas to get to work, and those were the times these companies were exploiting my ignorance. I was eating beans and rice for the tenth time, and the CEO of *insert product name here* was probably on his 5th vacation for the year. If I could go back and tell myself during those times what I know now, maybe I wouldn’t have been so stressed out, so resentful, and so tired. Since I can’t go back in time and talk to myself, I’ll share these things with you instead! If you are worried about your friends and acquaintances judging you, or saying you are “old fashioned” so be it, then laugh your way straight to the bank with all the money you are saving while they’re trying to figure out how to pay for things. I’m done feeling like everyone is benefiting off my hard earned dollar, and I’m done feeling like there is nothing else I can do for the planet. Aren’t you done too?

Don’t go to the fabric store again!

old curtains new chair covers the minimal geek

But MG… I have about 7 zillion projects that NEED FABRIC, where the hell am I supposed to get it from if you won’t let me go to the fabric store?

Well my little grasshopper, let me show you the way… my way… to the local thrift store…

Come on, you had to know that was going to be where we were headed at this point in the game!

Yes kids, when you need fabric for a project–I want you to first, go to a thrift store. Take yourself on a nice, romantic walk down the isle of discarded sheets, curtains, and bed spreads… there you will find a proverbial mecca of fabric in all different colors, textures, and weights! You’ll be delighted by the sights of not just the selections before you, but the PRICES.

I’ve walked through a fabric store many a time, and immediately I walked right back out. $10+ per yard of fabric? It’s a scandal! It’s an outrage! (10 points to whomever gets that reference…) I’ve been in the amateur sewing game for most of my adult life, after developing an obsession with baby-wearing when the MG kids were so tiny and so sweet and still so totally in love with me. You see, baby carriers come in all sorts of different shapes, sizes, and designs…and all of them are fabric. Some of these carriers can cost upwards of HUNDREDS of dollars–and when my kids were little, I didn’t have that kind of money to spend on a carrier, so I made my own! I couldn’t afford fabric either, and this is the part in the story where I have an epiphany as I’m folding a sheet. I held it out in front of me, gave it a tug this way and that, and immediately threw my toddler into a carry on my back via wrapping the sheet.  I walked around the house, did a little dance, a hop and a bounce and realized that this fabric was no different than the fabric used in the carriers! I immediately walked across the street to the thrift store and began perusing the sheets and fabric scraps, and came home with enough fabric to make dozens of carriers in all different kinds of cute patterns and colors.

10 years ago that day, I beat Joann at her own game.

Now that you know the thrift-store-fabric-shopping origin story, we can continue with your regularly scheduled programming.

Fast forward to this past weekend, and paint yourself a picture of MG standing in that exact same isle in her local thrift store. You see, I was hunting for curtains for my master bedroom in all truth, but came to a total stop when I found this gorgeous single panel in a soft and super dreamy sage green chenille. I knew I had to have it, and immediately my brain began searching through the multiple open tabs and back log of home projects to find something–anything I could reupholster!

Then it happened, my mind landed on our dining room chairs.

You see, Mrs MG and I just happened to be wandering around Walmart a few months ago and found an entire 6 piece dining room set marked on clearance with a whopping $35 price tag. That’s right… $35 dollars and I never had to look at the 70’s era family heirloom that was currently residing in our dining room again. Never had to sit on those hard wooden chairs, never had to push the table ends back together to close the gap in the center, never had to stub my toe on the weirdly angled legs… $35 was all that stood in the way of me and true happiness…

It went into the back of the van and ever since, I’ve been staring at those brown microfiber seats, grinding my teeth.

Ya’ll remember the one color MG hates in her house right?

No?

Guess what…

It’s brown. Yuck…

This curtain was just one panel though, but was it possible it could cover all 6 chairs? I didn’t have any measurements, I couldn’t be exact! Mrs MG god love her soul promised me the panel was plenty generous, but I didn’t believe her so I threw it down on the ground and spread it out like a picnic blanket. We each stood at one end pondering and arrived at the same conclusion… It.Would.Work!

Said curtain panel was by Restoration Hardware, if you’ve been around the home design game for a while you know that this is designer level shit, translation–expensive AF.

I googled this curtain panel and while it is discontinued now, it originally retailed for over $300/per panel. PER.FUCKING.PANEL. They better knock that shit off, right now.

I carried my priceless aptly priced treasure to the counter and I was on my way!

Sure as shooting, I had more than enough fabric on this one panel to cover all of my chairs. All you need is some super awesome fabric of your own, a screw driver, and a staple gun and you too can be rid of brown microfiber in exchange for oh-so-plush chenille.

chair seat before

Step 1, remove seats and use to measure fabric. Leave 1-2 inch overlap for stapling. 

This is the worlds most easy process, but I’ve included steps on the pictures if you are stumped. Just look at that brown… makes you want to cry, doesn’t it?

chair seat after

Staple fabric across one side of the seat, then pull tightly at opposite end and both sides. Leave corners last–fold corners over edge and smooth as much as possible. Staple. When done, trim excess fabric and re-attach seats to chairs. 

Before: drab, sad brown

After: pretty, plush sage green

Just don’t spill your wine on this! Drink wine in your tub, that way if you spill, you’ll be instantly cleaned off. Do like MG does.

new chair

Ta-da! Finished product!

Honestly, I really think that this fabric takes my chairs from  looking like $35 to looking like something that straddles the border between modern and bohemian. I think I’m legit in love… and now I can say that they’re “DESIGNER” chairs. Right?

Bonus points, because this panel is a near exact match for Sherwin Williams Acadia Haze, which is exactly what I painted my backsplash and kitchen island in.

Now the next time you get into your car and think you are headed to the fabric store, I want you to slap yourself right in your own face, and redirect to a local thrift store. Recycle, reduce, repurpose what we’ve already made. We can only reduce production by reducing consumerism, and you’ll save some big bucks too! I expect if I were to search for the same fabric I’d have spent probably a hundred dollars or more. Instead, I’m in it for about $1.25 per chair. That means, more wine money! YAY!


DIY Over-sized Headboard

DIY Headboard The Minimal Geek.png

Let’s talk about the idea of working with what you have… in the MG household, we call this “ingenuity” and we attempt it every day!

Do you know what the benefit is to working with what you already have?

YOU SAVE MONEY.

Yes… MG is a big fan of saving money, you might already know that though…

So now I share with you my brand new over-sized queen headboard and how it didn’t cost me a damn thing.

But let’s rewind…you see a few months ago we switched bedrooms with the kids and took the master back. After using no less than 1,000 gallons of primer, we were able to cover the crayola purple and blue that previously graced the walls and threw on my new favorite neutral paint color e-v-e-r, Sherwin Williams Alpaca…

Behold!

SW Alpaca.png

It’s not brown, it’s not grey… it lives squarely in what designers like to call “Greige” and it is amazing. 

As you may recall, MG is a big fan of shopping at the Habitat for Humanity ReStores, and yes, this is another one of those brand-spanking new $13 a gallon cans of paint I picked up there. The problem with this gorgeous, soft neutral was that it did not jive with what I had previously used as my anchor for a host of bright pinks, reds, purples, and cranberries to match the semi-Moroccan theme we had going on in our bedroom. We wanted something full of color, yet cozy, romantic, and comforting. Basically, what everyone wants for their master bedroom, am I right?

Of course I’m right… moving on.

I decided to replace the curtains as my first step. Nabbed a brand new and extremely high end set at a local thrift store for $8 a panel. After throwing in a new curtain rod from Ross, I was into my new window for a whopping $36!

I then decided that to complete my cozy and oh-so-romantic bedroom, I’d make a faux fireplace out of an old dresser mirror. (More on that to come, once it is finished!)

My next step was the bed, and I wanted it to be the focus of the room… the trouble is, I am an absolute sucker for the super tall over-sized headboards that you see floating around the depths of pinterest. The even bigger trouble with that was I had no desire to spend hundreds of dollars on one. I threw around a few ideas of DIY’ing a headboard, and ultimately decided upon finding some old front doors or shutters to make something in my self-defined style of “rustic-parisian” and put it into the back of my mind…..

For an approximate total of 4 hours, until I was walking through my garage and my eye landed on some old sliding closet doors from said bedroom.

Light bulb!

These doors were plain, white hallow-core sliding doors that were up in the master bedroom when we bought our house. When we removed the words worst-designed closet, I took the doors down to the garage, leaned them up against a wall, and never thought about them again. These doors are crazy, stupid wide–we’re talking 36″ a piece, on a wall that wasn’t much wider than the doors themselves. This resulted in only being able to access one section of the closet at a time, you’re seeing the problem here right? Turns out that problem ended up being a wonderful thing when I realized I had the full 59.5 inches I was looking for to build a headboard for my bed!

The construction of this headboard was painfully simple, anyone can do it–and I used crap I had laying around in my garage. But here is what you will need:

  • 2 Sliding Closet Doors (as wide as you’d like, my bed was 60″ and I was putting it into a corner, so I wanted it about a half inch to an inch smaller than my bed for clearance.)

*If your doors still have the sliding hardware on it, harvest the hardware. Keep the bigger sliding pieces and remove the wheels from it. What you are left with will have a hole on each end and a slight bend to the metal in the center. If you plan to mount your bed in the corner, you’ll want to use these as wall anchors like I did. If you do not want to mount your bed in a corner, skip this step.

  • 2 brackets and screws
  • 1 piece of decorative molding/trim to run along top of headboard, measured to width of headboard.
  • Paint, if desired
  • Extra-long screws for anchoring bed into wall (I used deck screws since it’s what I had on hand.)
  • 2 pieces 3/4″ square unfinished moulding/trim, measured to width of your headboard
  • 2 pieces 3/4″ square unfinished moulding/trim about 4-6 inches wide (this can be the ends of your long pieces)

*I had some of this leftover from my kitchen back-splash, it is super cheap and doesn’t have to look amazing. You’ll use this as support brackets on the back of the headboard if mounted in a corner, if mounted to the wall, skip this step.)


Now, here was what I did.

  • We removed about 12 inches on the outside of each door down the length. We sanded the raw edge and just pushed the new edges in towards each other so this seam ran down the center of the bed.

*Since we were mounting this in a corner, the backside of the bed was going to need more structural support. I took that left over trip and ran it from side to side and pushed a screw into each end. The inside center of these hallow-doors are hallow, but the edges are solid for hardware. I spaced these two support brackets to be just above and below the center of the bed. Think about where you lean back and push against a headboard–you’ll want your support there, where it is most important–in the middle.

  • Next, you’ll take those two small 4-6 inch pieces of trim scraps and center it on the center line of the two doors at the top and at the bottom and drill them in. This adds a little more stability and structure to the center line of the doors and will make it loads easier to move in a second.
  • Flip this big sucker around so you are on the front again.

*If you are mounting directly to a wall, go ahead and push two extra long screws into the top of each door–preferably at a stud for secure wall mounting. You can now move onto the decorative trim. It will hide your screws once it is secured to the top. 🙂

  • On the front of the head-board place the brackets on the top edge of the closet doors, one on each side and mark the location on the top of the door. Take the brackets and screw them into the backside of the trim. Your brackets will sit right on top of the door, dropping the trim across the top edge. Attach.

*If you wall-mounted, you are done! Finish with paint.

  • Placing this kind of a bed in a corner is where it gets tricky, this is a two person job of moving the headboard at various angles and placing your bed in front to see where you like it. We moved ours about 4 times, left the room for a few minutes to reset our eyes, came back in and nudged it over a bit more and we were good. There is no real art to this, just consider your foot path and how much you like the position.
  • Remember those parts I told you to harvest off your closet doors? These uniquely designed sliding components are perfect for mounting the head-board into the wall at this angle. Attach the sliding door part to the back-top side of the headboard (This will give support and structure at the top, while your bed gives support and structure to the bottom. Your brackets are in the middle and at this point, your bed isn’t going anywhere.) so that the crooked part of the top of the sliding door hardware extends forward towards the front of the headboard. It will be just wide enough to fill the gap between your headboard and the wall. Our bed was 60 inches and we cut our door down to about 59, leaving half an inch clearance on each side to sit back into the wall and for the brackets. Push those extra long screws through this hole, into an angle in the wall.
  • Give your bed a shake… if it is flopping around, you’re going to have to investigate why. At this point, it should be solid as a rock. We live in an earthquake zone and have small children and pets–everything gets anchored here.

Push bed against headboard again, decorate, and you are done! Get yourself a big ass glass of wine, sit down, and appreciate all your work.

Now, this project cost me literally nothing because I had this all laying around in my garage and I’ve got a bit of a hoarding problem when it comes to hardware and building supplies. But if you don’t happen to have any of this, these are super cheap materials. You can even use simple plywood sheathing! Check your Habitat For Humanity ReStores, or various social media groups before you hit the big box stores! Let’s please try to reduce some of the shit that ends up in landfills!

bed side view.jpg

Ahhhh, doesn’t that look inviting? 

bed.jpg

Walk right in, lay right down… 


I’m kind of obsessed with the clean lines of this headboard, originally we were talking about adding some depth and texture by placing custom cut wood pieces over the top… but now I’m thinking I like the minimal look and design of this. Sometimes a thing’s beauty lies in the simplicity of it. Making your own DIY headboard out of salvage and junk? Don’t forget to show MG!


How to Hack Your Universal Studios Vacation Planning

hack your universal vacation

As you know, MG is headed to Universal Studios in less than two weeks. You already know that MG just got back from Universal in Feb, and was at Universal Hollywood the September before that.

You probably think that I’m just about done with Universal for a while….but you’d be wrong!

As of last night, we decided to to work the Orlando Informer Meet Up into our vacation plans for next April… a blog post on that to come, but today I want to focus on our big family Christmas at Universal 2019 vacation plan and show you how to hack your planning, especially when traveling with kids and being on a budget.

Because let’s face it, if you have kids–you’re on a budget. Tell me I’m wrong and I’ll show you what I’m paying for two of my three kids currently in braces…

So if you’ve been here a moment, you’ve probably already read how we did Universal Hollywood with our kids on a Weasley budget. But that was California, today we will focus on taking our family to Universal Orlando, for 4 nights with 3 in-park days during peak season over Christmas. To date, I’ve only done trips to Universal Hollywood and Orlando during holidays because of our schedules, one of these days I swear I’m going during the off season! I swear it! Until then, let us assume you are also going on peak season, because like me, you can’t just pull your kids out of school all willy-nilly and have them miss a week of their education to run off and play. Though I’d LOVE to be this guy, I am currently drilling it into their heads that we work first, and play later. So assuming that you are like me and also planning your trip around a holiday, keep in mind that peak season = most expensive season + highest crowds. Savvy? Alright, let’s begin.


GETTING THERE

If you are in driving distance of Universal Orlando, this tells me you’re on the east coast. Gas is cheaper on the east coast, and I can tell you that were I in your shoes I’d be driving. If you are short on time, you can fly but driving is probably going to be a lot cheaper when you factor in the kid element.

If you are in the flying zone of vacation planning due to distance, time, and/or convenience then you are squarely in my wheelhouse. We live on the West Coast, so if we can book a non-stop we’re looking at a 6 hour flight, because we live so far away our tickets are probably going to be some of the most expensive you see. Without getting into pricing details because the point would be moot, I’ll bust a few myths instead.

  •  MYTH 1: Booking on a specific day or a specific number of days before your flight is the cheapest way to do it. This is grade A bullshit. You see, this didn’t just get made up and circle around the internet out of no-where. Once upon a time, back when airlines had no choice but to be competitive, there were secrets like this to securing a cheap ticket. I know this because I’ve been traveling since I was 5 years old. I did a lot of research on this, and tested it on 3 different cross-country trips to both a major international airport (MCO-Orlando) and a local regional airport in another state. This simply doesn’t work, and by waiting–your tickets will only go up in price.
  • MYTH 2: Discount travel booking sites are the cheapest way to buy a ticket. Again, this used to be a thing, and unless you have the time to risk 20+ hour flights with random half day layovers at airports unknown via the Priceline “Name your own price” system, there are better ways to find a cheap ticket. (Seriously, who the fuck has the time to sit in the airport for 2 days to save $300? Anyone? This system is inherently flawed, because if you could afford to miss that much time off work you wouldn’t be worried about the extra $300, would you?) So how, MG do I find the cheap tickets? Don’t worry, my little one… MG is here for you…
    • Use the flight matrix to see prices across all airlines for your travel dates and travel locations. There is an option to add airports to scan, and to see the calendar view of the cheapest dates to fly if your vacation is flexible. This is where I start my search.
    • Check Sky Scanner and set yourself fare price alerts for your flight dates and destination. If you have some time and want to watch the prices, Sky Scanner will send you alerts on the price changes be it up or down.
    • Check budget airlines directly. I used to fly Southwest quite a bit but they’ve become astronomically expensive in recent years, and I can fly cheaper on “name brand” airlines. I have a limited number of budget airlines being on the west coast, with the other option being Spirit. Compare the budget airlines directly against the results you’ll get on Sky Scanner and the Flight Matrix to see which option is cheapest. If you are near a major airport that serves as a hub for one of these discount airlines, you may want to consider following them on social media and/or subscribing to their sale alerts. Sometimes you can get a good deal! Just remember–all airlines charge differently for baggage depending on what fare class you are in, and your seat assignments. When comparing tickets against each other, keep that end cost in mind.
    • Buy your tickets as early as you are able. They will not get cheaper as you get closer.
    • Consider flying out of another airport if you have multiple airports close to you. The Seattle-Tacoma airport is the closest to me at 1.5 hours away, but Portland is only 2 hours away. When we went to Hollywood, we saved 2 thousand dollars by flying out of Portland instead of Seattle on a budget airline-Spirit. Different airports may offer different airlines and provide lower prices.


PARK TICKETS

Alright, let’s revisit my post on becoming a Universal Orlando Pass Holder.  Did you read it? No? Go read it and come back to this post.

Now that you’ve read that, you know that you can become a pass holder using the “Flex Pay” program with no credit check and only paying half down. Super cheap monthly payments after that. I used the Flex Pay option to buy the Preferred Annual Passes for myself, Mrs. MG, and Sister MG. (Why did MG buy a pass for her sister, you might be wondering? Well, MG and Sister MG have been in a nearly lifelong battle of competitive spoiling, and I bought her annual pass winning there by winning the last round. Ha!)

Now, let’s discuss 1st–approaching the park with Annual Passes.

  • If you are traveling to the parks during holidays, you’ll want to keep in mind that the lower two passes (Seasonal and Power) have peak season black out dates. The third pass (Preferred) has black out dates for early entry…but this is negated by staying at an onsite hotel or booking an offsite partner hotel through a Universal Package. The top level pass (Premier) has no black out dates on entry or on early park entry and is a favorite for people who stay off site.
  • If you feel like the idea of at least having one person be a pass holder to use the discounts and unlock exclusive pass holder rates to the onsite hotels, consider just registering one adult. The pass holder can then use their pass to purchase multi-day park tickets at the gate for a discount. (Seasonal=10%, Power, Preferred and Premier =15% on up to 6 guests per transaction.) The prices are slightly more expensive at the gate than buying online. If you use this option, I recommend building yourself time the day before your actual park days to stop by the gate and pick up your kids tickets.

Now, lets say you’ve decided park passes aren’t for you.

  • Traveling during peak season? Avoid deals like “buy two days, get two days free.” All though you are not required to use all these days in the same trip, your free days come with black out dates attached and this includes the Christmas holiday. Read the fine print on promotions like this carefully.
  • Discounting ticket avenues: a lot of people use and encourage the use of these avenues. I personally don’t like them because they worry me. I feel that if you are making this level of investment in a vacation, it’s safer to just go straight to the source. Because I don’t like them, I’m not going to recommend any, but if you have access to Tickets at Work through your employer, they offer some slightly lower prices and have been reported to be reputable. Likewise, AAA supposedly offers a discount, but I compared them side by side and it was the exact same price as the Universal website. Apparently, AAA FL members have access to special discount offers to the park.  That being said, I’ve only ever purchased all my tickets directly through Universal.

UNIVERSAL VACATION PACKAGES

A note on packages. I recommend against booking these packages for on-site hotels, unless you wish to utilize the two alternative methods of paying for your vacation.

  • Method 1: With a minimum credit score of 500, paying a 11% down payment, and 10% monthly interest rate, you can use the external “Uplift” financing system and make monthly payments on your trip. For frugality reasons alone, I do not recommend this.
  • Method 2: For pure convenience alone, you can book your entire package and ONLY pay a deposit. The package I played with was a Harry Potter package that included:  4 nights on site, and 3 in park days with 3 “juniors” 2-park, park to park tickets plus a 3 day photo package and all the other “bonus” items that are (not) “free” with the package, and it only asked for a $300 deposit. It allows you to split payments for your package over multiple cards, and allows you to set up an auto-debit at a date of your choosing to pull the remaining balance of your trip up to roughly a month before you go. *Pro hack: I confirmed with Universal that you can call into the reservations line and make “payments” on your trip. This allows you to skip the external financing company and save yourself the interest and credit check!

WHERE TO STAY

To stay on-site or off-site, that is the question.

  • The answer? That depends on your budget and your access to a car. If you are not a pass holder and have access to car, you might find it more economic to stay off-site. There are hotels right by the park, but remember–you’ll pay for parking each time you go to the park and that adds up every day. By in large, off-site hotels are not only cheaper, but offer free breakfast (keep in mind, this may be well after the hour of early park entry) and other special perks. If you need to stay off-site due to budget, I strongly encourage you to look for one with a park shuttle. This way, you won’t have to pay for parking at Universal! But remember, you’ll only get early park admission by booking an off-site partner hotel through a Universal Package. *Pro-hack: Have your park purchases sent to the front gate so you don’t have to carry them around all day. It’s free and easy! Just pick up as you leave!
  • On-site is more expensive, especially during peak season and/or if you do not have access to a pass holder hotel discount. (Pass holder hotel discounts vary from 15% to 30% depending on rooms to fill at each hotel during that time of year. They are limited, and often difficult to find.) You won’t get a free breakfast and you’ll still have to pay to park at the hotel (much less than the park garage) but once you are at the resort, you are there! If you are flying in, I recommend skipping the rental car (Use a Lyft to get to the resort for around $30-that’s less than the airport transfers) and putting that money to use by staying on-site instead! All resort hotels provide transportation from the hotel to the park, additionally you can access amenities at all the other resort hotels. *Pro-hack: Want to have the complete Universal experience, but can’t afford one more day in the park? Build in a day to pool hop at the resort hotels! It won’t cost you anything to do this and your family will still have a blast.


Alright, now that we’ve gotten the meat of all of these bigger issues settled, it is time to get into the actual planning of my vacation.

Now, you know how I just said not to buy a package? Why would MG say this to you when there are so many free perks? Well, my little ones… those perks that are built into your package aren’t even free. WHAT?! I crunched the numbers by comparing the cost of the hotel with a harry potter package to booking the on-site hotel directly through universal. The cost of my hotel in the package was almost $400 more than booking without the package. I then calculated the difference and determined that not only was I paying for the Shutterbutton’s session, but also determined that the two days of “free” breakfasts for my party added up to about $17.10 per person, which is more expensive than the actual $16.99/adult and $12.59/kids breakfast plates.

Now, I’ll fully confess, I used the package when we went to Hollywood, and when we went in February with just the adults. When we stayed off-site, the package appeared to be a good value and it gave us access to the off-site partner hotels that granted us early park admission. Running the scenario with an on-site hotel however, the numbers don’t jive.


Step 1: Book an on-site hotel through Universal Orlando Resort.

3 Adults (MG, Mrs MG, Sister MG) 

3 Kids (11, 13, 14 years) 

4 Nights On-Site Hotel, with 3 In-Park Days

Now, because I have 6 people in my party, I actually have a few options for family suites at the various hotels across the resort. Coming 2019 and 2020 are two new “value” hotels for Universal’s “Endless Summer” resort brand.  These hotels are designed to be around $100 a night and built to suit larger family groups so those on a budget can have the complete universal experience! My hats off to universal for thinking about this and making a plan to accommodate families like this.

A family suite at the new Endless Summer Value Resort, the Surfside Inn and Suites is a 2 bedroom room designed to sleep six, with a kitchenette. I’ve selected this, and am asked to pay only a deposit equal to one night. During the holiday season, this value resort is $243.10 a night, giving me a total with tax of $1093.95. *Pro Hack: Pass holders can check back frequently for pass holder rates during their time of travel and simply change their reservation and get the lower rate.

Step 2: Park Tickets

Since I’m a Preferred Pass Holder, I’ll get a 15% discount by buying the kids tickets at the gate. If I purchase online, I’ll save $30 from gate prices. I estimate that’s an additional $10 a head at the gate. This would put my cost online at $942.51, but my pass holder discount is the greater savings, allowing me to pay only $826.63, and save a total of $145.88. By making sure my flight get’s in a little early on our arrival day, I can just pop over to the park after we check into our hotel and grab the tickets for the kids, then my valuable early park entry time won’t be eaten up by long ticketing lines.

Step 3: Food

I’ve just written an in depth post on how to eat at Universal on a budget. (<– *Pro-hacks abound!) I highly recommend you check it out, as I’ve addressed all the ways to save without feeling like you’re giving up part of the experience. While I get a 10% pass holder discount on food for all in my party, I think that I will have a greater savings for my omnivore children by purchasing them the Universal Quick Service Dining Plan. I can purchase this at the same time I grab those tickets, and it is $23.99/adult (ages 10+) per day. This will provide them one quick service meal and beverage, 1 additional beverage, and 1 snack. My children eat a lot, they enjoy soda, and they tend to pick more expensive menu items so this plan will save me a lot more money than my discount. This will cost $71.97/per day for 3 adult meal plans at a total of $215.91 for our 3 in-park days.

Step 4: Souvenirs

  • Universal isn’t overly expensive and they offer a lot of souvenir items at a range of prices.  For the ultimate low end of the budget, you can grab a “1st visit” park pin at guest services, or a park map for free. You can also do pressed pennies at various locations in the park. We are going to be giving our children their souvenir budget on a gift card. We’ve also requested “park spending money” from family in advance in lieu of sending birthday and Christmas gifts. We’re encouraging the children to start saving their money now so they’ll have more to spend at the park. You can buy park gift cards online and have them mailed right to you.
  • Pictures are free, and now and days most everyone has access to a smart phone. When on a strict budget, consider assigning children different areas of the park to photograph, and making a scrap book once you are home.
  • Buy before you go! Purchase park lanyards and any special t-shirts (minions, jurassic park, harry potter, transformers, etc.) in advance online. I purchased wands for the kids, and their harry potter house shirts on amazon for our Hollywood trip and spent less than the cost of 1 t-shirt in the park. This is also where I purchased my park lanyards which you’ll want if you have park-to-park passes.
  • There are also various facebook groups online dedicated to leaving prizes and gifts inside the park. These generous individuals will post photos of their “drop area” and/or riddles of where to find them. There is also a Universal Rocks page, where painted rocks are left at the park to find and keep, or re-hide.

Step 5: Non-Park Activities

  • Staying on-site grants you access to all kinds of free activities you wouldn’t otherwise be able to access. My favorite, is resort pool hopping! If you need to shave some money off of your trip budget, replace a day in the park with a day of pools.
    • Portifino Bay: 3 pools, the Vila, Hillside, and Beach, including 1 with a grotto
    • Hard Rock: Hot Tubs, a Beach, and a Waterslide. Music plays in the guitar shaped pool and can be heard underwater.
    • Sapphire Falls: Tropical pool with a water slide.
    • Royal Pacific: Pool and hot tub
    • Cabana Bay: Pool with lazy river. *Pro-hack: Order your own cheap floats on amazon and pack them in your luggage. Cabana bay will fill for free. The floats at the hotel must be purchased separately.
  • Tour the streets of Italy at the Portifino Bay.
  • Ride the water taxis.
  • Watch the Torch Lighting Ceremony in the evenings at the Royal Pacific.
  • “Drive-in” style pool movies at Cabana Bay and Adventura.
  • Find the Berlin Wall at the Hard Rock.
  • Pack some marshmallows and visit one of the resort fire pits.
  • Visit the “three beaches” of Italy, the South Pacific, and the Caribbean at the resort hotels.
  • Visit the CityWalk Splash Pad.
  • Check out various live entertainment at CityWalk.

Excluding the cost of airfare, which for me is generally around $3000 from Seattle to Orlando, I’m currently at $2136.49 for the 3 kids tickets, our hotel for 6 people, and 3 meal plans. I’m building in a budget of roughly $30 a day/each for Mrs MG and I to eat on (we are vegetarians, don’t drink soda, and often share a kids meal or eat from sides on the menu), and another $15/per child to eat dinner for a total of $225 in additional food cost, bringing me up to $2361.49. We like to build our special “snacks” into our souvenir budget and provide roughly a $20 buffer into that for each child, for things like a Lard Lad Donut or a Butterbeer. Otherwise, we will be purchasing the refillable popcorn bucket for our children because, honestly I don’t think that they have a more favorite snack. Maybe it’s because I was so afraid that genetically modified shit would fuck up my kids for so long that they didn’t have it. You know, it’s like one of those forbidden pleasures for them now. Anyway, I digress…. for one flat price, we have our bucket for the entire trip, and can refill it for $2 whenever they want more. Otherwise, we always carry Clif bars, trail mix, and applesauce packets as well as our own water bottles when we’re in the park. Since our room will have a kitchenette and will likely use it to eat oatmeal and/or cereal in the mornings before setting out. This is not something I worry about when it is just the adults, but a definite must for traveling with kids on a budget! (*Pro-hack: if you are on a strict budget, have some groceries delivered to your resort hotel, and return to your room for lunches. Make your big resort meal once a day instead of 2 or 3.)


Getting to the parks is probably the most expensive part, then paying for the park entry is right behind it. Even though I pay monthly for our 3 annual passes, I enjoy that factor of not having to worry about our tickets when we go. If we were staying any longer than 3 days in the park, we’d invest in annual passes for our kids as well because it really is a great value when you plan to be there 5 days or longer. Plus, the discounts that come with the passes can sometimes pay for themselves!

When you have to pay for a vacation in one lump sum, it can seem impossible when the cost is this high, but if you know far enough in advance that this is something you want to do, I recommend tackling one thing at a time. Since we are a cash only, no debt family who are sadly not millionaires or the recipients of substantial inheritance from mystery relatives,  we have to plan our trips as far out in advance as possible so we can build them into our regular budget. We book our hotel first and pay that first night deposit. Then we buy our plane tickets. We will next build into our budget the total cost of the hotel, and pay for that once we have it in advance. After that, we worry about any additional park tickets we may need to buy and set that aside. Then we just save for the food and extras we want to do. This way is a lot more manageable, and makes me feel like I’m moving our trip forward with each thing I check off our list. If I were interested in paying more, I’d just bundle everything together into a package and simply phone into the reservation line to make payments when I had them–but this is MG we are talking about here. I won’t pay $0.20 more for something that I know cost $0.20 less.

Now for the big disclosure, because I’m sure you are wondering how we can afford multiple trips in a year to the park. It took us years to get to this point, years of working our way up in entry level jobs, making hard sacrifices and major commitments to living the lifestyle we live. A lifestyle of frugality and minimalism. But I don’t get anything for free for the tips and tricks I post here. This is all just a summary of my endless research because I’m looking for the best way to provide these experiences within the means that we have!

I hope this helps you have the vacation of your dreams on the budget that you can afford!


Universal Orlando Resort Affordable Eating Guide

eat on a budget universal orlando

You’re welcome.

What are we welcome for, MG?

For this guide I’m about to share with you. I’ve actually spent countless hours scouring the internet for this information and have come up with no blog content like this. I decided that since it didn’t exist, I’d create it and share it with you my good people. All 3 of you who follow me.

In my searches I’ve read countless “how to save money at Universal” posts. They’re by in large–fucking ridiculous. And honestly, most of them are just copy and pasting bullshit they read from someone else and regurgitating it as their own “exclusive” inside information to you. I’ve said it before, but I really enjoy how absolutely clueless people are when they write content about “saving money” and include comments like “we got all this for free because my sister’s husbands, brother runs this resort,” or “I happened to get a discounted/free room during the off season so I could blog at you about why you should go all-in on vacation at “x” location,” and my personal favorite, “my parent’s gifted this to us so their grandchildren could have this experience.”

Raise your hand if this shit just plain doesn’t jive with normal people living normal lives.

*MG’s hand is up in the air*

Just know that when I offer you my resources on saving money, they’re actually realistic.

In those “how to save money” posts I’ve stumbled across so much bad information, it made me cringe. I ask the blogging world gods one question… if you are telling me to SPEND money… in some cases, HUNDREDS of dollars on express passes that do nothing besides move me through a line quicker, how in the hell is that actually SAVING me money? If I had a dollar for every time I saw that in a “ways to save” post I could have paid for half my upcoming trip to the studios.

So, just what is this post going to focus on then if I’m not pushing the park’s express passes onto you as part of the “free night stay” blogger package? Well, we’re going to talk about FOOD, and only FOOD. We’ve already addressed the best way to save money on the tickets, and that is absolutely without a doubt to become a pass holder, but did you know that by being a pass holder you can save 10 to 15% off the cost of your FOOD in the park, depending on what level pass you purchase? (There are 4 pass levels, the lower 3 will get you 10%, while the top pass gets you 15%.) Yeah.. you can bet this is going to come up into our discussion. So, without further adieu… let’s begin.

I’m going to the parks for 8 nights over the Christmas holiday. Mrs. MG and I are finally celebrating our belated honeymoon. 3 years belated to be exact.

But why so late, MG?

Because MG couldn’t afford it 3 years ago. And MG has priorities, during that time it was about feeding our family and keeping our roof over our heads. It took a long time to get here, but here we are. I’ve calculated out our anticipated dining expenses for this trip and came to a staggering $800 for the week.  This is double what MG spends to feed her family of five for a month. 

I anticipated that 3 meals in the park a day would run a little over $16 a meal with the breakfast options being the most expensive at $16.99 in the Wizarding World. This led me to a nice round number of $50 per person per day, which is $800 for the time that we are there at $100 a day. This is just 3 meals a day, no “snacks” like Lard Lad Donuts and Butterbeer! I deliberately excluded our 10% Pass Holder discount as a way to build in cushion if any of our meals went over $16. Holy shit, right? This is what birthed the post you are getting today.

Now this budget is fairly low, given that Mrs. MG and I do not drink soda except for on rare occasion, and while we drink alcohol we don’t generally purchase it at restaurants as it is marked up and watered down. We also don’t eat meat, so our meals tend to be cheaper than the average omnivore. Now I was getting anxious about building snacks into the budget, or if I should take them out of my “souvenir” budget because MG will drink butterbeer until she barfs… you can count on that. This is where I began researching and looking for ways to trim this budget down because while I could afford it, $800 is just fucking nuts. So I read through the deepest, darkest cracks of the Universal world and managed to find some great tips and tricks I am most anxious to try–none of which involve returning to my room twice a day to eat crappy sandwiches from bread and peanut butter I had to order from amazon prime now, or bringing a crock pot and having it “cook a meal for me” in my hotel room while I am at the park (I shit you not, I’ve read countless people pack their crock pots and instant pots into their luggage and do this… I’m going to pass.)

  • Quick Service Meal Plan. $23.99 (+ I believe 6.5% tax) is a good option if you are a meat eater and/or love soda. This plan provides you with 1 quick service meal + a soda, 1 extra soda, and 1 snack. Depending on which areas of the park you use this (it is limited and all items will be marked with a UD) you can actually save money using this plan. I did this in FEB because we had 4 adults and no idea what to expect in cost. We stuck inside the Wizarding World with this and it saved us money, considering a butterbeer is $7 and considered a “snack” on the plan. On average we saved about $5 per person. This will get you a basic fountain soda, not a freestyle soda or you can use it to get bottled water. There are no pass holder discounts for this and if you want to just “pay for your meals in advance” this is a good option. Being vegetarian pass holders, this plan does not save us money so we skipped it, but it is worth mentioning.
  • SODA- skip it. Do you know how hot FL is? You need to stay hydrated and you need to do that with water. If you can’t skip it, there are two other ways to approach this habit you have. Option A: You can purchase a Freestyle Cup, which is about $16 to buy out right. You’d have to drink 5 cups of soda in a day to break even on day 1 with this cup. Once you’ve purchased the cup you get free refills every 10 minutes for the rest of the day. Each day thereafter you pay a reduced price to “reactivate” your cup, which is generally around $8 leaving you at another 3 cups of soda a day to break even. A lot of people will opt to buy one cup, and share it among a family by pouring the soda into another cup then refilling it 10 minutes later with a new flavor. If you are on a tight budget and like soda- this is a good option. Option B: Buy a “Souvenir Cup” these cups are generally shaped like a characters head, they cost roughly $16 and the first fill is included with that price. Refills there after are discounted to just over a buck. You do not have to pay to “reactivate” these cups like the freestyle cups.  *Pro-tip, check eBay for your freestyle cups before you go to the park. I’ve found them in 3 cup bulk lots for as little as $5 a cup. If the cup doesn’t work when you reactivate it, the park will swap it at no cost. A little planning will save you big time with those cups! And don’t toss them when you leave, bring them back on future trips!
  • WATER. Boy was I unprepared for water in Florida. Let’s talk about this. First and foremost as someone who likes to reduce their waste, I carry a water bottle with me everywhere. Sometimes I have two in my bag, and I always have a huge Coleman water jug in the car at all times. I went to Universal with one of my standard water bottles expecting to just fill them at the fountains like I did at Universal Hollywood. Now, FL does have fountains but the water is beyond disgusting. FL water is nasty as fuck. Don’t drink that shit. This led to me essentially wasting all of my “soda” credits on my meal plan to get bottles of water. In FL cups of water are free (it’s a law!) at all restaurants and stands, so you can get your cups or your water bottles filled up with ice and ice cold water at no cost; however, the confirmation on if this is tap water or filtered water tends to be hit or miss. I highly recommend purchasing a Brita water bottle with the built in filter. An expert local park goer recommended this to me and promises it filters out the nasty taste! I purchased a bulk pack of 3 in the “camo” color on Amazon for under $30 as they were the cheapest option. Just know, you do not have to pay for bottled water if you don’t mind getting the cups of water that may or may not be from the tap from any food stand/restaurant. (If you buy your Universal Passes with an AMEX you can get access to the AMEX Pass Holders lounge where there are free bottles of water. You have to buy your pass with an AMEX though. I’ve heard that you can hack this by simply loading a pre-paid AMEX logo card with the money for the passes and use that to buy your passes with. Boom, you’re in the club and no credit card debt to show for it.)
  • BRING YOUR OWN SNACKS: Universal lets you bring in just about anything as long as it is cold and/or you have a special dietary restriction. We bring our own Clif Bars, applesauce pouches and trail mix to eat as snacks in between our meals. Saves us a fortune and keeps us feeling good with not eating junk every time we’re hungry. And since we eat small meals all day long, we are always fucking hungry. We pack ours in our suitcase and check 1 bag for the two of us. It’s cheaper for me to buy and bring them from here, than to order from a delivery service in FL. Honestly! Did this for California and it was a lifesaver with 3 kids. *It doesn’t hurt to have extra snacks in your hotel room when you are feeling peckish, and consider bringing some instant oatmeal packets for a quick pre-park breakfast! Pour into a coffee cup and heat water in your basic resort room with your coffee pot. Instant oatmeal packets can be purchased in bulk for super cheap on Amazon before you go!
  • SHARE A MEAL: Seriously, if you and your traveling companion may want the same thing, split a meal. The portions in the resort are large and more than enough for two people with average appetites. Mrs MG and I share almost everything because we eat small meals more frequently.
  • ORDER THE KIDS MEAL: I saw a side-by-side comparison photo recently taken inside the Wizarding World at the Three Broomsticks of an adult sized and kid sized Full English Breakfast. They were nearly identical, with the kid sized plate missing 1 piece of meat and possibly 1 vegetable. And insanely enough, the kid size plate was still large enough I believe that Mrs MG and I could share it! We’re going to test this hack on our trip and report back with photos. 😉
  • ORDER APPS: Look at the appetizer menu first, and consider ordering that instead of a meal. I was astonished when I ordered the hummus appetizer at one of the resort restaurants and it was big enough for four adults to eat from and still had food left over. It was half the cost of my dinner plate and I was almost too full from eating that delicious hummus and pillowy pita bread to even eat my meal once it arrived! If you’re in doubt about your appetite, order the appetizer first, eat that… and if still hungry-go ahead and request to see the menu again.
  • CONSIDER SIDES: As a vegetarian, sometimes the “SIDES” menu is the first place I look. It is generally where I can find items that don’t have meat in them. More times than once I’ve made myself a “meal” out of the side options and each side is generally around $3-$5.
  • KEEP YOUR LEFTOVERS: Take your leftovers back to your hotel. Stay on-site my friends and you can just walk this right over, pop it in your mini-fridge, and head back to the park. You’ll be happy they are there later when you are looking for a late night snack before bed! If you aren’t staying on site, don’t be that guy who is lugging around hot, soggy leftovers and stinking up the 3D ride with it.
  • (Updated Jan 2019) BOOZE: Let’s just put in a little footnote on booze. Since returning from my trip, I’m happy to tell you that I single-handedly discovered all the cheapest ways to drink while staying at the resort. Ha!
    • Order the bottle—if you are at a restaurant and know that you’ll have at least two glasses, order the bottle. It’s still going to be upwards of $28/bottle, but you’ll save a lot versus the “per glass” prices. You’ll have a wonderful server bring you the bottle to sample first, so have no fear! If you picked a flop, you can send it back and try something else. If you are ordering a bottle inside City Walk, but don’t finish it, you can very nicely ask your server to bag it up and take back to your hotel. They technically “aren’t supposed” to do this, but most of them will if you aren’t a dick to them. Leave a nice tip after to show your appreciation.
    • Resort Souvenir Glasses are the cheapest way to drink those “froo-froo” beverages that I was really digging like the Froze and the Strawberry Sunburn at Portifino. By purchasing the souvenir glass, you’ll get $3 discounted refills on all your future drinks. You can ask for a clean set when you leave, and take that set back the next day to any resort hotel. The only resort it doesn’t work at is Cabana Bay as they have a different style of glass that is safe for being taken into the water. (Yes, you can float the lazy river with your beverage in tow!) and they’re actually larger cups and priced much cheaper! The glass is $15 and your refills are only $10. Cabana Bay only lets you buy one a time so it’s a little frustrating to get out of the lazy river each round to get a refill, but they have their own drink menu and some delicious mango options. Yum!
  • CITY WALK IS CHEAPER: If you can pull yourself away from the parks, the food options at City Walk are cheaper than inside the park. You’re still on the resort property, your pass holder discount still works, most places accept the dining plan, and there are a lot more options that are friendlier to the budget without the huge lines in the park. During one especially frustrating afternoon inside Studios in Feb,  we wandered from place to place inside the park searching for one location that didn’t have a 2 year long line for food. It was not pleasant. 2 out of 4 of us went full hangry-bitch by the time we arrived at the third failed location.  Had I known this hack I would have taken full advantage and snarled less at my traveling group.
    • Bread Box has sandwiches as low as $7.99 and they come with a side of fries or tots. Soup is only $4.99, and there are 3 vegetarian sandwich options here!
    • Hot Dog Hall of Fame start at $8.99 and come with fries. There is supposed to be a veggie dog option here but I won’t be able to confirm that until my December trip.
    • Red Oven Pizza Bakery has pizzas for between $13-$14 and I hear they are large enough for more than 2 people to eat off of.
    • Antojitos Authentic Mexican has kids options for only $6.99 and is a great way to save at this more expensive option in City Walk. I am also equally impressed with their sides on their regular dinner menu. I could easily build a meal out of the black beans, roasted vegetables, and plantains for $3.50 each and at $10.50 for my whole meal still spend less than the cost of a dinner plate. *While pricey, I hear the table-side guac is to die-for and an experience worth splurging on.
    • NBC Sports Grill & Brew has long been a favorite to park goers on a budget. They have modestly priced items with humongous portions. I saw a picture of their soft pretzel recently ($12.95) and it could easily provide a snack to 4 people! The equally priced Grilled Vegetable Pasta could easily feed two people, making that $6.50 a person when you share. Don’t want to share there? Check out the kids menu, it is all priced at $6.99 a plate.
    • The Cowfish also offers $6.99 kids meal bento boxes, and on the adult end the $17 and $18 priced bento boxes appear to be a great value to also share, offering a burger and sushi along with several other sides.
    • Bob Marley also delivers with large portions, I was recently impressed by a photo of the stuffed peppers that could easily be shared. While some of their menu is limited (like the kids options and sides) there are a few low budget gems on there. You can grab either the vegetable patties or the beef patties for only $9.95. If you are looking to splurge, I hear the stuffed peppers are divine-and for only a dollar more, you’ll get two peppers stuffed to the brim with veggies and rice, a side of greens, and a side of vegetables.
  • REFILLABLE POPCORN BUCKET: There is no cheaper snack in the park than the park popcorn via the refillable souvenir bucket. It will run you about $10, then refills of hot, buttery popcorn will cost you less than $2 after that. If you’ve got a bunch of kids, or you feel really passionate about popcorn this is your best value. You can bring these buckets back to the parks over and over again (just like your cups.)
  • PARK SNACKS MAKE GREAT BREAKFASTS: Skip that crazy line at Voodoo donuts and go straight to Springfield USA in Universal Studios Florida. Grab yourself a nice, pink Lard Lad Donut. These things are the size of small-ish to medium sized pizzas, they’re absolutely enormous and completely delicious! These will set you back around $6… and while you could share it, I don’t think you’ll want to. If I am honest, the MG family each devoured their own and three of us hate donuts. They’re that good. Sometimes when I’m at work, I stare into my computer screen thinking about the first bite I took out of one of these bad boys. #trueconfession
  • STARBUCKS BENTO BOXES: We all have a Starbucks near us if we’re living in the USA. And if you’ve ever been inside one you know that they have delightful cold food options in the form of their bento boxes. Consider grabbing one at City Walk or inside Islands of Adventure/Universal Studios Florida for a lunch on the go while you are walking through the park. They aren’t big enough to share but they’re about half the price of a meal in the park for lunch. This is a great option to munch on if you are standing in a long ride line. #multitasking
  • CHEAP FOOD inside UNIVERSAL STUDIOS FLORIDA:
    • The Leaky Cauldron has a lot to offer in terms of huge shareable portions. Personally, I prefer the breakfast offerings in the Wizarding World more than the lunch/dinner options. If you have to pick one meal to eat there, I strongly recommend making it your breakfast option. An adult breakfast plate is $16.99 but that splurge will get you a butterbeer as an option for your included beverage! I love the oatmeal apple flan but the full english is a great option to share. Since my family is a mixture of vegetarians and omnivores, we like to order the full english and pass off the items we don’t want to others in our group. Sister MG and the MG kids generally pass us their beans and mushrooms, while we give them our meat. It’s a win win and everyone is happy. If you go with lunch or dinner, go with an appetite and consider the Plougman’s platter which was designed to feed 2 for $21.99 but could actually reasonably feed 4.
    • London Taxi Hut (at the London Waterfront-little green building) is home of the famous “jacket potato” and all it’s varieties. They feature two vegetarian options like beans and cheese and broccoli and cheese, and two meat options with the shepherds pie and loaded. These potatoes are rumored to keep you full all day for only $8!
    • Bumblebee Man’s Taco Truck will net you 2 tacos and a side of chips for $9.99 and from what I hear the servings are large. You won’t find vegetarian options here however, but I’ll be asking to see if they can modify something for us on our upcoming trip.
    • Krusty Burger’s prices are all over the place, but you can find the vegetarian black bean “Mother Nature” burger or the 1/3 pound “Krusty Burger” platter for $11.49 and each comes with a side of Kurly fries. This is probably your cheapest “burger” option in the park.
    • Louie’s Italian Restaurant is also reported to have large portions good to share. But beware, their pizzas can skyrocket to $38! Stick to the soup at $5 a cup, or consider their pasta dishes. They are certainly more middle of the road in price, ranging from $12.29 for the vegan spaghetti featuring Gardein meatless crumbles (a new and exciting option that graced the menus late 2018) to the Fettuccine Alfredo with Chicken at only $10.79, and both options include a breadstick (breadstick not vegan).
    • Luigi’s Pizza is the cheapest place for pizza inside this park, with options from $10.99 to their most expensive at $15.49. You could certainly share a pizza here and feel no strain to the budget.
  • CHEAP FOOD inside ISLANDS OF ADVENTURE:
    • Croissant Moon Bakery is arguably the cheapest place to grab breakfast on your way into the parks. Grab a croissant for only $2.59 or splurge on a chocolate croissant for a whopping $3.19. Looking for something more substantial? Choose the “on the run” breakfast and get a fruit cup, your choice of a danish or muffin, and a “breakfast drink” for only $6.29. *Their Port of Call sandwiches make them a great option for a shareable lunch that includes potato salad, a muffin, and fresh fruit for only $12.49!
    • Three Broomsticks is home to the “GREAT FEAST,” get your wallets out for this one though, because this will set you back $59.99. It is said to be enough to feed four people, but the 3 MG children and Sister MG could not finish it. I think this could reasonably feed closer to 6 people than 4 and with a larger group going family style on this platter, it is a better bargain.
    • Confisco Grille has a robust appetizer menu that ranges in price from $7.49-$11.99 for it’s most expensive item- a whole pizza. Here, eating off the appetizer menu is sure to save you some money without leaving you feeling wanting.
    • Thunderfalls Terrace has an excellent selection of cheap side items to build a meal out of. Items are priced from $1.79 to $4.99 for it’s most expensive option- a soup. You could put together the white rice with cilantro and lime, the black beans, and the fresh roasted corn for a full meal and only spend $7.57! That is less than ten bucks for an entire meal made out of sides. Plenty of options there…. remember, MG just told you to consider SIDES first.
    • Doc Sugrue’s Desert Kebab House is probably the best bang for your buck inside IOA. You can choose from a selection of vegetarian and meat kebabs $10.49-$12.49, or grab the super popular hummus snack which comes with pita bread, celery and carrots for only $4.99.

And until I return from my December trip, I’m done for now. Loads of options to choose from at every price point, and I didn’t even bother with the more expensive eateries in the park where an average meal will set you back around $16. I’ve always been impressed with the size of the portions, the quality of the food, and the value you are getting inside Universal so I think that it is safe to say that eating on a budget inside Universal can be done, and without feeling strained or like you are giving up too much!

Now you’ve made it through an entire post of affordable in park eating options without being told to go back to your room and eat the worlds saddest fucking PB&J’s or risk burning down the resort when your pressure cooker malfunctions and explodes. Remember, if you are a pass holder (and you should be…) always ask for the pass holder discount and flash your pass. Some places legitimately don’t take it… and some will tell you they don’t by mistake. If this happens or you forget to ask, save your receipts! On your way out of the park, hit guest services and they’ll refund you your discount!!! When you walk out of guest services with your refund, be sure to let the mic drop as the door slams behind you.

Stay tuned for even more tips and tricks after our vacation and a post on exactly how much it cost us to go to Universal Studios for a week, and stay on site for 8 nights during their peak time of year, including details on how much it cost us to eat at the park (no sad sandwiches for us) and what we spent on souvenirs! I’ll answer all of your burning “but how much did it cost” questions when we get back in that post!

Cheapest way to get Universal Studios Orlando park tickets! UOAP!


uoap secret.png

Maybe you’re a little bit like me. On a scale of 1 to 10, your obsession with Harry Potter is 9 3/4. Hogwarts is your home. Butterbeer is your favorite beverage. The happy, flitting sounds of music from the Harry Potter opening scenes bring a tear to your eye.

If you’re like me, besides diving into the books or becoming absorbed into the movies, where do you go to celebrate your love? How do you get home again?

You go to Universal Studios.

Now if you’ve been around for a minute or two, you know that I’ve recently been to both the Hollywood and Orlando locations. I’ve written my thoughts on it, how much it cost my family, and how we approached each trip to be able to afford it and manage spending while there. You also know that we’re not rich! We don’t live in debt, and we do not use credit cards.

This year, MG took on a new job, that created a serious bump in pay.  (Still not rich!) This began making the option of going to Universal more than once in a lifetime a very real possibility. Because I knew that this was my goal, and that Mrs. MG and I have both agreed to make Universal our regular vacation spot, I began preparing for this by researching how to make any of this even be possible. The first thing I did was begin researching a way to earn airline miles without the use of credit cards. Once I opened my Delta Skymiles Debit account, linked it with my Delta miles account, and began earning miles I knew we’d get a lot of help there with the cost of airfare. I then began looking into how to make my second biggest expense more manageable.

Park Tickets.

Park tickets are in fact, the second biggest expense to anyone who is flying in. They can easily cost as much as air fare, and more than your hotel by double. The longer you want to be in the parks, the higher your cost goes. With my new job, I have access to a discount ticketing website, but their tickets cap out at 5 days. I joined a few groups on Facebook and began reading the tips and tricks from long time park goers when I saw one very common theme of opinion on park tickets.

There is a rule of thumb, and that is that if you are going to do the park for a week or longer, it is cheaper to buy an annual pass. 

This doesn’t just mean a week at a time, this can mean people who want to go on multiple trips that would equal 7 in park days. This is precisely where I began to do the math. Universal passes are exclusive to each park, this means Hollywood’s pass only works in Hollywood, and Orlando’s pass only works in Orlando. So I immediately removed my Hollywood trip from this equation and began factoring Orlando. We were there for 3 days in March, we wanted to go back this December. We’re going for 8 days total (including travel days) which leaves us with 6 full in park days. I didn’t think we’d be able to afford the tickets so I was trying to limit our trip to another 3-4 day visit. This already came out at the “week or longer” rule of thumb. I knew that it would be a long time before I could buy two year passes but decided to check out the pricing anyway. I was in for a surprise!

First, there are two ways to pay for your tickets. You can either pay for them up front at once, or use Universals Flex Pay program. With Flex Pay you pay for half the pass as a down payment, then finance the rest at 0% interest, no credit check by making  monthly payments spread out over the 12 months of your pass. Your pass doesnt activate until you use it for the first time, and from there your 12 month count down of pass use begins. This means if you buy the pass in June, you start paying for it in June, but if you don’t travel until December, your 12 months USAGE starts in December.

I did the math, I could stretch and pay for it all up front, or I could use the flex pay system and work it into my budget. My pay had gone up recently, so I could afford the monthly payment. I would even earn miles on it every month with my Delta card instead of maxing out my miles for that month (4k miles a month on the delta debit card) with this purchase and missing out on all my other purchases. No credit check and no interest? I went for the Flex Pay option.

Before I get into the cost of that, I want to touch on the fact that there are 4 different levels of passes for Universal Studios. It is VERY IMPORTANT to carefully read each pass before picking one. We went with Preferred. This is the 3rd from the top. Since we generally travel around holidays, we did not want to be restricted to block out dates. Universal has a series of block out dates that sync up with holidays due to their special holiday events. The two lower level passes: Power and Annual have block out dates. Originally I was looking at the premier pass, because it offers a 15% in park merch and dining discount (restrictions apply) as opposed to the 10% offered by the other 3 passes. I then decided that the math didn’t jive, as my spending on the cost of the pass, would never equal the 15% savings. I would also never use the free valet parking, we probably will never go to HHN (Halloween Horror Nights) which offers 1 admission in the premier pass, and we didn’t care about the free express passes after 4pm since we’re not major ride people.  (You can get 2 days of express passes included for the cost of 1 night at 3 of the premier level onsite hotels should you choose to stay there, and this is a hack that many people employ as it often costs less than buying the passes during peak times.)

Preferred has no black out dates on entry, but has black out dates on early park admission. So if you are staying off site, this would be a concern. We considered it and because I’m a cheap skate by nature I kept trying to talk myself into staying off park to save half the cost of our hotel on our upcoming holiday honeymoon. That quickly went away when I remembered why I feel so strongly about staying on site. You’re going to pay more by staying on site during peak season, but the convenience and the perks that come with on site access is WORTH IT.  And since we stay on site, we get early park entry anyway so we don’t have to worry about those black out dates.

Ultimately, I felt that for the kind of Universal travelers we are, that Preferred was the best option and the best price.

Universal’s website isn’t the easiest to navigate, but all of the information can be found there on their section about their Annual Passes. Pay close attention also to if you are purchasing a 2 park or 3 park pass. Their 3 park pass includes their new water park, Volcano Bay. We aren’t water park people- we’re Harry Potter People. We went with the 2 park pass, if we decide we ever do want to go to Volcano Bay, we can buy a discounted 1 day pass to that park at the gate with our Annual Passes. 🙂

The 2 Park Preferred passes I purchased for myself, Mrs. MG, and sister MG (we’re bringing her for the last 3 days of our honeymoon this Christmas as her Christmas gift) cost $394.99 each. With the flex pay option, I paid $631.02 down on our passes, and will only pay $57.37 a month for the next 12 months. That’s right, less than $58 a month for THREE ANNUAL PASSES! What’s better, is that right now–Universal Studios has thrown in an extra SIX MONTHS FREE until April 2019. Be advised, the lower two passes only offer 3 months, while they upper two passes give you 6 months.

Purchase and activate by Apr. 4, 2019. Restrictions apply.

I got 18 months for each of us, at the $394 price a year on each 2 park preferred pass. That gives you tickets at $1.51 a DAY for 597 days!

Here is a summary of what we’re getting with our pass:

  • Unlimited Park to Park Admission to Universal Studios and Islands of Adventure with no blocked out dates. 
  • Free self parking *after first visit.
  • Early Park Admission has block out dates on this pass, but this doesn’t apply if you stay ON SITE.
  • Discounted food, merch, and specialty items in the parks and in City Walk–10% (Discount will be limited inside the Wizarding World of Harry Potter due to licensing restrictions but the rule is to always flash your pass and ask.)
  • On-site hotel room discounts. (These discounts are limited and vary up to 30%, with highest discount generally available in off season only, and at specific hotels the park is looking to fill.)
  • Admission to select special events and concerts (ie: Mardi Gras, but not HHN.)
  • Discounts on theme park and special events tickets. (Example: discounted tickets to HHN, or Volcano Bay, and additional tickets purchased at the gate for non-pass holder members of your party.)

Honestly, I feel that $400 for 12 months is a steal, considering it would cost me that for 1 person to go for longer than 3 days. These passes are also “park to park” tickets, meaning you can ride the Hogwarts Express between Islands and Studios, a feature that is an an extra cost on standard tickets. Universal also offers a once a year “Pass Holders Appreciation” Month with all sorts of special extras. (This year was August, we weren’t pass holders yet but they shut the park down to pass holders only at a time during this special month, and in the past have offered discounts on meal plans and other vacation add-on items.) You can also get special pass holder only buttons at guest services when visiting the park, so bonus points for free souvenirs!

hp uoap.jpg

Now I just need to decide which UOAP decal I want to put on my minivan. I’m thinking this Harry Potter version would go nicely with my Hogwarts House Crests Family.


Another top secret special tip I can offer you is that if you are booking your on-site hotel far enough in advance through the Universal website, you’ll be asked to pay the rate of 1 night as a deposit on your hotel, and you can then either finance your vacation through their outside agency (at a steep interest rate) or make payments on your hotel up to a certain date before your travel in which it would be paid off at no additional cost to you. I stumbled across this while planning our 2019 big family holiday vacation.

You can also sometimes get better rates on a hotel plus other freebies by “booking” a package, but removing the park ticket. Keep in mind, that Universal also offers a special pass holder phone number for booking Pass Holder Vacation Packages with all sorts of added extras!


This is now how we’re able to afford Universal for an 8 day vacation this December, and a big family vacation in 2019. Any extra time in between will be a big bonus! In the 3 months that I’ve had my Suntrust Delta Debit account, I’ve already earned roughly 10,000 miles! I haven’t even booked our tickets for our upcoming trip yet which will be 2 miles for every 1 dollar spent on Delta flights! After a while, I’ll be able to use miles for travel and once I’ve hit medallion status, I’ll get unlimited free upgrades from Delta and access to their lounge.


Universal doesn’t make it clear that these resources are there, but I’m happy to find them and share them with everyone. Family vacations are precious things, that I am honored to share in with my children and my family. Growing up, I never had these experiences, and my children think they are common place. It is possible, with the right planning, and the right resources it can be done. Memory making shouldn’t come at such an outrageous cost. As I get closer to planning my big family 2019 holiday vacation at Universal, I’ll lay out all the details on how I approached it, and how I paid for 3 adults and 3 children (with possibly 2 more adults in the form of grandma and grandpa coming along as well) with a lot of careful planning, research, and money saving tips and tricks.